Peek Inside 30 Homes, All Decked Out for Christmas
Architectural And Beautiful Living Space For A Happy Home That Is Zx100
Đăng ký:
Đăng Nhận xét (Atom)
-------------------------------------------
Install Farming Simulator 2019 with working MULTIPLAYER FOR FREE - Duration: 5:35. For more infomation >> Install Farming Simulator 2019 with working MULTIPLAYER FOR FREE - Duration: 5:35.
 -------------------------------------------
What Is Black Garlic and Why Is It So Good For You? - Duration: 2:56.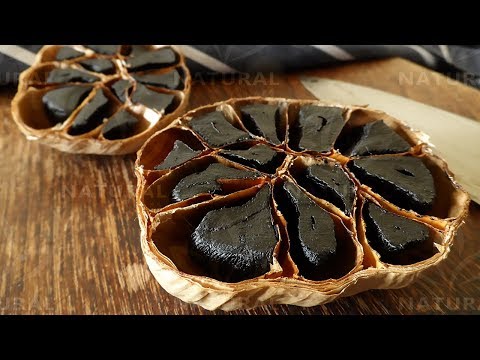
Do you know what black garlic is?
Although it may just look like rotten garlic, or garlic that has been cooked for too long,
it's actually become very famous around the world due to it's culinary uses and health
benefits.
It becomes black when the garlic heads rot enough to become black and develop a smooth,
sticky texture quite similar to the texture of dates.
What about the flavor?
If you don't really like traditional garlic, you may enjoy this black version which is
sweeter and earthier and many people describe it as being very tasty.
The most interesting part about this black garlic is that it can be consumed in large
quantities.
Due to how rich its flavors are, it has become very popular in cooking, but what really makes
it special are its amazing health properties.
Originally from Korea, black garlic was created as a health product and was considered a better
tasting way to benefit from garlic's properties:
It calms your nerves Most people may not know, but black garlic
is able to improve your mood, relieve anxiety, and decrease stress.
It prevents heart diseases Thanks to allicin, black garlic is become
a great ally to our heart and circulatory systems health by thinning our blood, reducing
blood clotting and decreasing the risk of a stroke or thrombosis and also lowering bad
cholesterol levels.
It improves our body's defenses Garlic is known for improving our body's
defenses.
If you're feeling like your immune system is low or if you catch the flu or colds often
then black garlic may be the thing for you.
Certain studies have even suggested that it can help prevent cancer.
It combats fatigue Aged garlic is great for anyone who wants
to increase their physical resistance.
It also combats fatigue and improves sleep quality.
It helps treat respiratory problems Black garlic is also considered to be a great
remedy for fighting common respiratory diseases, allergies, and even asthma symptoms.
It's a diuretic Since it's rich in potassium, this garlic
is recommended for people who suffer from liquid retention, edemas or kidney problems.
It's good for your skin People who have skin problems such as dermatitis,
acne, psoriasis or rosacea can benefit from ingesting raw garlic.
Since it contains sulfur compounds, this ingredient also contributes to the formation of collagen,
a key protein for skin health.
You can find black garlic at natural products stores, but if you want you can also prepare
it at home.
In the next video we'll teach you how to prepare this recipe at home, stay tuned!
-------------------------------------------
Learning Alphabets | Bob The Train | Kindergarten Learning Videos For Children by KIds Tv - Duration: 1:06:01.
Hi
I'm Bob the train
Do you wanna go on an Alphabet ride with me
Yes
A
A
B
B
C
And
D
E
E
F
F
G
H
I
J
J
K
K
L
And
M
N
N
O
O
P
Q
R
S
S
T
T
U
And
V
W
X
And
Y
And
Z
Wasn't that fun let's start from Zz this time
Z and Y and X and W
V and U and T and S
R and Q and P and O
N and M and L
K
J
I and H and G and F
E
D
C and B and A
One more time starting from A let's all sing together now
A and B and C and D
E and F and G and H
I
J and K and L and M
N and O and P and Q
R
S and T and U and V
W
X and Y and Z
Did you enjoy the alphabet with Bob the train
See you again next time
-------------------------------------------
Martha and Donald - Happy Family - Cartoon For Kids - Episode 2 (Magic Telescope) - Duration: 1:32. For more infomation >> Martha and Donald - Happy Family - Cartoon For Kids - Episode 2 (Magic Telescope) - Duration: 1:32.
 -------------------------------------------
How does the compliance testing for electronics work? - Duration: 7:05.
In this video, I want to try and explain a bit about
the compliance testing we've been doing.
So first question is
If you've ever looked on the back of a product before,
you'll often get these little symbols. In fact, this one looks like
it's, this is the Taiwanese compliance testing. But if it was sold in the EU or America, we'd
need the CE certification, the Europe or FCC for America. And what those certifications
mean is you're allowed to sell the products there, so it's important if you're making
a product. Why they have them is mostly these days is for not making a mess of other people's radio.
radio. So because there's so much communication that happens on radio; like Wi-Fi, mobile
phones, Bluetooth, all those kind of stuff. If you make a Bluetooth device and it is much
louder electromagnetically than it should be, maybe when you turn it on it interrupts
the Wi-Fi or it stops the ambulance radio communication from working or something that
we really don't want as a whole group of people who are using radio comm. So with certification,
one of the most important tests is you put your product into a special chamber, which
is an anechoic chamber,
so it stops all the radiation
from leaking out, it's like a sealed room
they use for sound as well,
but this is a special one for
radio waves.
And you
put your device into test, in our case, a keyboard on a special rotating turntable,
and then everyone leaves the room and you use antennas that are fitted onto these structures
that can go up and down. So then you spin it around and you listen to it to find out
where the worst emissions are and there's certain guidelines that you have to follow.
So they scan a whole frequency and you've got to make sure that the level of your emissions
is below a certain point, so that's fine.
We've managed to get through that.
And then there was
being immune to when say you're at home and you're using your keyboard
and somebody turns on a hair dryer. Then all of a sudden you get a spike in the voltage,
that spike goes through your pc and you get a little bit out through the USB as well.
And so the keyboard has got to keep working there.
So that is immunity
conducted immunity
cause it's, the signals are being conducted through the wires and the keyboard has to
stay immune. So that was fine as well.
The one that we failed on
was the ESD testing,
and ESD stands for electrostatic discharge.
And what that is, is if you're ever in an
airport, this always happens to me in an airport. I'm walking around the airport, I grab something
and I get pah! Get a little shock.
The way that you test that is on this picture here,
you have a special gun and there's two tests. There's one where you're putting the spike
in contact with the keyboard and you put 4,000 volts very quickly, like the kind of spark
that you get if you're walking around in airports. And on the corners and in the Huble,
all the kinds of places where you think it might be weak and the keyboard has to keep
working. It's allowed to reset or to, for the lights to
flicker. But if it stops working and it doesn't stop working and then you fail. And what we
had was, there was a couple of weak points on the Huble where if you zapped it just
right, it would reset and it wouldn't reconnect right to the computer without plugging it
out and in again, so it failed. So the first thing that I started doing when
we got back to the UK was talking to a consultant that I know to give me advice on how to fix
that and then trying as best as I could to check it here without this equipment cause these
are like four or 5,000 euros. You can hire them for about 500 euros for a week, but we
wanted to just try some stuff quickly. So I made up this ghetto ESD testing platform
with a little spark gun here. There's a layer of silver foil underneath and you can see
an incredibly quick spark that is basically just a cigarette lighter, that I emptied the gas out.
And the idea is this is plugged into a computer and then you spark it in
its weak points to get it to reset and then you can try different things.
So mostly what I was doing was adding extra filtering on the ports, adding some extra
capacitors to soak up that brief charge to stop it from resetting too badly. And then
we sent it to the UK to get it pretested again so we could get that done really quickly,
and we passed.
So that's good.
Just a quick demo of this then. So as well as doing when
you're zapping it on the board, like this in connection, you can also do it where you're
a little bit further away and that creates like a electromagnetic shockwave that passes.
And one thing I noticed as I was doing the test, if you watch these green lights up there,
they're the kind of my online services I'm monitoring. If I do a few clicks on the,
so this would fail the ESD air shocking because it is, it no wouldn't fail actually. This would
be Class B passed because it's affected but it boots up. But
if would be a fail, if it failed and then it didn't reboot.
This is a test report from our friends at Unit 3 Compliance. They're really good guys
if you need any testing done. And they tested it slightly higher than we needed to make
sure that we pass when we do the final test. Now what I've been doing is, back on the Huble, I've
gone through all the places where I added these capacitors so more on the part of like,
more on the filtering for the USD, more on the resets circuits added extra ESD protection,
all those kind stuff. And now I'm in the last little bit of work in doing the final bit
of routing before the new version of the Huble is ready to be made again. So that's the compliance
in a nutshell. And then we will go, after we've built a whole new set of PCBs, we'll
have them built up in China, our factory will take them to the testing facility that we're
using there and do the FCC and the CEC, the CE and a couple of other ones. And then once
you've got CE and FCC those are the strictest ones, so it's easy to then get the other tests
usually just by filling in a bit of paperwork. Fingers crossed everything will go well, we'll
get those two main certificates and then we'll be able to start applying for the other ones
as well.
Thanks guys for watching my video.
-------------------------------------------
No Graphics for 5 AM Newscast - Duration: 1:37. For more infomation >> No Graphics for 5 AM Newscast - Duration: 1:37.
 -------------------------------------------
Toy Guns Box of Toys for Children Learn Colors with Toy Weapons - Duration: 7:07.
Toy Guns Box of Toys for Children Learn Colors with Toy Weapons
-------------------------------------------
Talent for Good - charity auction - Duration: 0:21. For more infomation >> Talent for Good - charity auction - Duration: 0:21.
 -------------------------------------------
How to Use Mapping for Ice Fishing - Duration: 3:55.
Going out to this hump?
Yes
This is a piece of structure
that's isolated and what I'm gonna do is
I'm gonna drive around detailing the drop off of the hump
and then go and drill the key points open.
So here you can see on the HELIX I have the cartography
set at 24 feet. The depth I want to fish
plus or minus 2 feet. Now I'm gonna zoom out and
go scroll over to the hump that I want to fish what I like here is there's two
main points and then one steeper break that dumps off into a saddle.
The neat thing about this just like when you're in a boat you
could seek out spots all across the main lake and go around them to get the
contour line draw it with your machine I'm in a track truck or you could have
a snowmobile whatever and you can go from hump to hump really fast and all
of the guesswork is eliminated so you've cut your time way down and you have more
time to fish and make it happen because I don't have this computer chip in my
head I have to use my machine to draw it and then I could go on the tracks and cut the holes.
I'm gonna show you exactly what I'm doing but from above so
this should be a really cool shot.
Now we got the drone in the air don't let's see how it's done from the sky
basically there's a lot of little knobs and little notches but I'm more
concerned with the three main points and you can see all this piece of structure
lays out now.
There it is.
Now comparative to the truck you could see how big the
spot is and without having this and the drone in the air you think this is a
small piece of structure in a map it gives you a true understanding how big
these structures are and on a limited amount of time I don't have a lot of
time to go find fish so I want to find them fast
this really helps you out.
Now I got a nice trail here and I'm not going to
drill the whole hump open because there's not enough time to fish the
whole thing but I'm gonna hit the three corners and then move on.
Corner number one.
This is a nice little corner because it's on an inside turn see there's a
little hook that comes back in so I'm going to drill right on the tip of the
point before it comes back into the to the hook here and I'm gonna get in right there.
So here's where I'm going to drill my first hole I'm actually gonna drill
it right behind the truck.
The nice thing is the tracks flatten an area so when
you're out fishing you have a little area that you can walk on especially
when you got a lot of snow it makes life easier.
If one hole is productive I'll drill a few more
or if I think the contour deserves it I'll drill more
holes but just drilling a lot of holes is not a good way to go.
Start out with a few holes spread across an area
then fine-tune and this way you can maximize the number of holes and time.
By using your Humminbird Depth Highlight it allows you to eliminate water
really fast and now you can actually see,
I can see how big this piece of structure really is in comparison to the size of
the lake or us we're just one little spot on this giant piece of structure
and there's so many so it puts
it into true perspective and that's really neat.
The key thing is to keep running and gunning until you hit the jackpot.
-------------------------------------------
Laksha two Ways| Flour Noodles for Hunza Soup Dawdo| Winter recipes of Hunza - Duration: 4:47. For more infomation >> Laksha two Ways| Flour Noodles for Hunza Soup Dawdo| Winter recipes of Hunza - Duration: 4:47.
 -------------------------------------------
Medical Marijuana Timeline Estimated for Spring 2019 - Duration: 1:13. For more infomation >> Medical Marijuana Timeline Estimated for Spring 2019 - Duration: 1:13.
 -------------------------------------------
How to Make Fairy Princess Crowns for Dolls - TUTORIAL DIY - Duration: 19:56.
Hi I'm Traci Akierman the designer and creator behind KeLibu.
I make patterns for 14 to 20 inch dolls as well as videos like this one showing you how
to enhance your patterns and how to make cool accessories to go with your
outfits. If you haven't already subscribed, consider doing so and hit the
notification bell so you always know when I post a new content.
Today, we're going to be making these crowns fit for a fairy or a princess. Let's get creating!
Hi thanks for joining me today. So let's go over what we're going to need for
this project. The first thing you're going to need is wrapped wire. This is
sometimes called grapevine wire, sometimes wrapped wire, basically it's
about a 14 to 16 gauge wire on the inside that's had this natural raffia or
something similar wrapped around it. We're gonna be using that as the base
for our crown. Next thing you're going to need is some raffia or floral tape that
is in a complementary color to the wire so you can hide some of the things that
you're going to add to the crown. This is optional but today I'm going to be using
this leaf trim to wrap around my crown. So if you have something that you'd like
to use you can go ahead and do that, otherwise it looks great without it as well.
You need either some pearl or crystal picks which are basically just
wires with a pearl or a crystal on the end. Or you can make your own. I'm gonna
show you how to make your own because I couldn't find any in an appropriate size
near me, so I'm just going to use some little pearl glass seed beads and some
little insect charms that I found as well as some 32 gauge beading wire to
make the picks. And lastly you're going to need some sort of embellishment to
put on the front of your crown. I have some resin flowers here
that I'm going to be using today. You could use a bezel-set gem, anything like
that anything that you think goes with the theme of your crown. Next you're
gonna need a couple of tools ...let me move these things out of the way a bit. You're going to
need some wire cutters. You're going to need some pliers. I have jewelry pliers
here but you can use needle nose if you'd like. You're going to need a glue
gun ... and this is a low-temperature glue gun that I'm using because I find I can
manipulate the glue a little bit once I've added it without burning my fingers.
And some e6000 or Craft Goop glue is probably going to be your best bet for
gluing your charm on to the front. So you need to take your doll that you're going
to make the crown for and probably pull her hair back into a ponytail just to
keep it out of the way. Unwrap a good section of the wire from the coil.
Now with this crown, we want it to come sort of to about here on her head. It's not
going to wrap all the way around but of course the design is up to you. I'm just
going to be doing a double V today. So I'm actually extending it past the point
that I want it to reach when it's done because I'm going to double it back and
I'm going to bring it to the middle of her forehead. And then just using my
fingers, or you can use pliers, I'm going to make a V. Now that's sitting pretty
nice, what I'm gonna do with this end piece is bend it around like that in a U
because eventually I'm gonna bring this back around. I'm just gonna try and get this
as even as possible. So I'm making another bend here.
Bringing this around. I want my V to be in roughly the same
place as the top part. And now I'm gonna cut this off and then I'm gonna work with it.
After a bunch of fiddling around, you should end up with the shape that
you're pretty happy with. And then you need to take care of this joint so...
You've got this piece and this piece and you're going to overlap them like that.
So just take your glue gun run some glue along there hold the two pieces together
until the glue sets. And then for a little added security I'm going to take
a piece of raffia and just wrap it around there.
So starting on the on the inside, I'm gonna put some glue
and then start wrapping it around.
That's just gonna help keep that joint secure and hide it a little bit.
This is a really fiddly thing to do on camera but I'm giving it my best shot. The raffia
is gonna want to split on you. That's okay just force it into submission.
Okay I've come to the end of my piece so I'm just gonna put a dab of glue there.
Hold it down. Here's why I like the low-temperature
glue gun because I can actually press that raffia into the glue and it doesn't
burn my finger. Having said that though, please exercise caution because I don't
want you guys to burn yourselves. Okay so we've got the base for our crown.
We've got the end covered in raffia. If you're a fan of symmetry you might want
to wrap some raffia around that end too just to make them look even but by the
time you get done putting your embellishments on you're probably not going to notice that in much anyway.
Now we have to make our picks that I was
talking about earlier. So you need to cut about three or four inches of the thin
wire. put a bead on to the end of it, bring the bead to the middle and double
the wire. And then pinching the wire between your fingers really close to the
bead, just give the bead a couple of turns and then just keep twisting the
two pieces together so they become one. And you just need to make however many
of these you think you're gonna want to add to your fairy crown. So the process
for doing it for the little charms is the same.
I 'm just going to cut about three to four inches of wire off, get my little insect
threaded on to the wire, double it up,
pinch close to the end of the charm and twist.
So that one's ready to go. So you just need to make as many as you want to put
on to your fairy crown and then we'll go on to the next stage.
I've got my crown ready to go. I've got a bunch of picks made up. I've got my raffia and glue gun
within easy reach and I've got my trim. So this is a kind of a long piece of
trim, so I'm going to cut it down just to make it easier to weave in and out of
this. So I'm just going to measure it along the circumference of the top of
the crown and add a little extra.
And starting with a dab of glue on the inside edge, I'm going to affix the trim,
let it set, and just start winding it around my fairy crown.
Now how loose or tight you want to wind this is totally up to you.
I'm going to keep it sort of taut so that I don't have to do much in the way of
securing it apart from just wrapping it around here. But I am going to frequently
check to make sure that I like my leaf placement.
And that it's going to stay in place.
So ideally I'd like some of my leaves pointing up and some pointing down.
So I think what I'm going to do is actually secure it with a little bit of glue here.
Just put the tiniest little dab. That micro tip glue gun is really helpful for that.
So I'm gonna get that in place and then I'll keep winding.
And you just keep going like that until you have the trim placed where you want it, securing it with glue as needed.
I have secured my trim all the way around.
I have tried to get rid of most of the glue strings that come with using the
glue gun which are so annoying. And originally I was thinking I was going to
put this trim around the bottom as well but I think that might make it look too
busy so I'm just going to go ahead and leave it on the top only. My next step is
to figure out where do I want to add my picks. So the nice thing about these
being on wire is you can add them. If you don't like where you've placed them you
can move them around, though this thinner wire is a bit brittle so you need to be
careful not to manipulate it too much or it will want to break. You also need to
be careful not to stab yourself with it because it can go into your fingers
pretty easily since it's so small. So I'm going to go around and add... I've added one
little insect guy here. I think I'm going to take two of these together two of
these pearl beads
and let's see ...wrap them like that.
So I'm just placing them on to the base. Wrapping the wires around and around to secure them.
I've added all of my little picks.
And I'm pretty happy with the placement so if you wanted to, you could just leave it like
this if you don't mind the wire showing but I don't particularly like the way
that looks so I am going to go ahead and cut small sections of my raffia.
And using my trusty glue gun, starting from the inside, I am going to just wrap the
raffia around my base to cover up the silver wire bits. Now it's always best to
try and start it on the inside and end it on the inside. So I put a drop of glue
there, cut this off, and smooth it into place. And I've got one little straggler
there so I'm just gonna add another tiny dab of glue. Push it down. Hold it in place 'til it sets.
Get rid of the annoying glue strings and now I've covered up this
section and all that's showing is the little pick. So I'm going to go ahead and
do that all along this bottom wherever I have
wire wrapped. And then we'll proceed to the last step, which is fixing at the
front so that you can glue on whatever gem or adornment that you've chosen for the front of your crown.
I finished wrapping around the frame of
the crown everywhere that I've added a pick. And I'm ready to move on to the next
stage so, because I'm going to be placing my resin flower in the center here and I
want to glue it on with E6000 because I want to make sure that it
really sticks and hot glue is not going to do the trick.
What I'm going to do is wrap some raffia in between these two points to give an
additional bit for the flower to stick onto. So I'm just gonna cut a length of
raffia here. I've got a knot so I'm not sure exactly how much I'm gonna need
so I'm gonna cut a generous amount off - a couple of inches. I'm going to start from
the inside of the bottom point I put a dot of glue there. Secure the
raffia to the point give it a second to set up there and I want to make sure I
know... my flower is about an inch long so I just want to make sure that I'm
wrapping my raffia so that I've got about an inch of space in
between the two points when I'm done.
Now to secure this first thing I'm going to do is tack the end down.
Give that a minute to set.
Trim it and then I'm actually gonna go back and put some glue in
between the the two wraps to further strengthen it. So I'm just going to jam
my tip of my glue gun in between those two wraps of raffia. Squish them together.
Let that set.
And now I should have a pretty stable base. Oh I think I need
to do the same thing from the other side here. It didn't quite stick all the way through.
So it's gonna push those two sides together and pull some of the
excess glue strings off. Okay so now I've got a base on which to glue my resin flower.
I've got my tube of E6000 here and I've also used Craft Goop. It's a
little less smelly than the E6000 but I'm out right now so I'm gonna use this.
I also like to keep some tissue handy because once you open this up the glue
just keeps coming and coming and coming. So
I'm going to take this off. I'm going to smear a generous amount on this raffia bridge that I've built.
Wipe it off and get the cap on very quickly. And then I'm going to position my
resin flower in the center here.
Now it's gonna want to slip and slide around a bit at first so...
Kind of hold it in place for a little while until it sets.
So I'm going to go ahead and do that and then I'll be back to show you the finished crown on my doll when the glue is all set.
I hope you enjoyed learning how to make these
crowns today.If you did please give the video a thumbs up and share it with a friend.
I'd like to hear from you guys... what would you like to see me cover in
the future? Please let me know in the comments below.
Thanks for watching. We'll see you next time.
-------------------------------------------
Ttop foods that gain weight for babies | Gain weight food for babies - Duration: 2:51.
top foods that gain weight for babies babies
sweet potatoes sweet potatoes are easy to boil and mash they are tasty
nutritious easy to digest and healthy they are also rich in vitamin A vitamin
C vitamin b6 copper phosphorus potassium and manganese the best vitamins for kids
to gain weight in weight
breast milk breast milk is the best source of weight gain for babies till
one year followed the w-h-o recommendation of breastfeeding your
baby exclusively for the first six months and frequently after that when
breastfeeding make sure you empty one breast completely before moving to the
next this is because the milk the baby gets at the beginning of the feeding is
the thinner for milk and the fat rich Hyndman comes after that
eggs this powerhouse of protein should be introduced to kids only after they
complete 12 months eggs are rich in saturated fats proteins vitamins and
minerals you can serve them as an omelet scrambled boiled egg rice or french
toast
banana bananas are among the most popular first foods for babies for a
variety of reasons they are naturally sweet can be mashed without any
equipment and don't require cooking they're also an excellent travel food
for babies and kids being an energy dense fruit makes it ideal for helping
babies gain weight and it also provides dietary fiber potassium as well as other
minerals and vitamins
peas peas are among the most nutritious vegetables that can be introduced as
babies first solid food after crossing six months it is very high in dietary
fiber thiamine vitamin C and high in magnesium niacin phosphorus and vitamins
A b6 e six
-------------------------------------------
Finding Planet Nine - the Search for a New Planet - Duration: 7:59.
There is evidence of a giant planet lurking in the outer solar system at more than a thousand
times the distance from the Sun as Earth, and could be as much as 25,000 times fainter
than Pluto.
Astronomers are gazing into the abyss in search of Planet Nine. Welcome back to Launch Pad,
I'm Christian Ready, your friendly neighborhood astronomer. In our previous video, we looked
at evidence for a large planet that would be lurking in the outer solar system.
And this planet would explain the orbital clustering of several trans-Neptunian objects.
However, evidence of a planet is not nearly as good as finding the planet itself.
In this video, we're going to talk about how astronomers are doing just that.
Mike Brown and Konstantin Batygin of Caltech ran several computer simulations to determine
what kinds of orbits Planet Nine could have.
But all of them are highly elongated and tend to point away from the clustered objects.That
means from our vantage point here on Earth, Planet Nine's possible orbits are confined to a
band encircling us around the sky.
Even so, this band is a really large search area.
Fortunately, there are some clues that help us narrow down where in the sky to search.
Planet Nine is estimated to be about 10 times more massive than Earth, and comes no closer
than about 300 astronomical units to the Sun.
Even though that's 10 times farther from the Sun than Neptune, Planet Nine should still
have been bright enough to have been detected in previous surveys.
An examination of recent surveys showed no evidence for such a planet.
This suggests that Planet Nine is probably near its farthest point from the Sun, or aphelion.
And that makes sense because as planets approach perihelion, they speed up, whereas when they
approach aphelion, they slow down.
Planet Nine should therefore spend most of its 20,000 year orbit near aphelion.
But its aphelion distance could be as much as 1,000 astronomical units.
At that distance, Planet Nine would be 25,000 times fainter than Pluto.
Telescopes like Keck and Hubble should have no trouble spotting Planet Nine, but their
fields of view are incredibly small, and the search area in Taurus and Orion is something
like 4,000 times the size of the full Moon.
So using Keck or Hubble would be like squinting through a soda straw. But
there is a telescope that's right next door to Keck.
It's the 8.2 meter, Subaru telescope, the national telescope of Japan.
Subaru is equipped with the Hyper Suprime-Cam, an 870 megapixel camera that can capture 6
full moons' worth of sky in a single image.
Planet Nine's aphelion should be somewhere between the constellations Orion and Taurus,
making the search area visible from September through February of every year.
Subaru should be able to cover the search area in about 20 nights.
That may not seem like a lot of time, but astronomers using Subaru to search for Planet
Nine have to compete with other astronomers for time on the telescope.
Not only that but, bad weather interfered with the first two years of Planet Nine searching,
so only a fraction of the search area has been covered to date.
At this rate, it'll probably take a few more years before the entire Planet Nine search
area is completely covered.
Luckily, a second team of astronomers led by Scott Sheppard from Carnegie Science are
also using Subaru to conduct their own search for Planet Nine.
Even better, Sheppard's team are also piggybacking on another survey with another telescope.
The Dark Energy Survey uses the 4-meter Victor Blanco Telescope at the Cerro Tololo Inter-American
Observatory in Chile.
The telescope used the Dark Energy Camera, or DECam mounted at the telescope's prime
focus.
DECam's field of view is twice the Hyper Suprime-Cam mounted on the Subaru telescope.
But its detector is 300 megapixels smaller and it's mounted to a telescope that is half
the size of Subaru.
Even so, Sheppard and his team used the Blanco telescope to discover several new trans-Neptunian
objects that are even fainter than Planet Nine is predicted to be.
So this tells us that the search for Planet Nine is in fact possible.
And by the way, these objects all follow orbits that are clustered in a manner that is consistent
with Planet Nine.
Now you may be wondering how is it they keep finding these tiny objects when there's supposedly
a giant planet they haven't found yet?
Well the answer is we expect there to be thousands, maybe even hundreds of thousands of these
tiny objects, but only one giant planet.
It's like going fishing in the ocean - you expect to catch a lot of small fish, but you
don't expect to catch a whale.
But what if neither the Subaru nor Blanco telescopes find Planet Nine?
That would be unfortunate, but it would't necessarily rule out the planet's existence.
It could mean it's simply on a different part of its orbit, so a different region of the
sky would need to be searched.
Or it could be that Planet Nine is on a much larger orbit than predicted, and its aphelion
would carry it farther away, making it too faint to be detected by Subaru.
But there is another possibility which kinda gives us the screaming heebie-jeebies.
Planet Nine could be passing in front of the Milky Way, lost in the glare of a crowded
field of bright background stars.
Fortunately, there's a telescope under construction that should be able to resolve Planet Nine
even among such a crowded field.
The Large Synoptic Survey Telescope will make the widest and deepest scan of the southern
sky over the course of a decade.
LSST will be armed with an 8.4 meter mirror, and a gigantic, 3 Gigapixel camera with a
9.6 square degree field of view.
That will give LSST the sensitivity and clarity to distinguish Planet Nine even if it's
fainter than expected, and even if it's passing across the Milky Way.
Not only that, but LSST will complete a full scan of the entire sky once every five to
seven days and repeat over and over again for a decade.
That means that every point in the sky will be imaged by LSST more than 800 times.
This means that if Planet Nine is on a completely different orbit, or if it's farther and fainter
than expected, LSST should be able to detect it as long as it's somewhere in the southern
sky.
Meanwhile, the search for Planet Nine continues.
It's November 2018, and Mike Brown and his team have time scheduled on Subaru in December.
This will mark the third year searching for Planet Nine, and hopefully a little bit more
of the sky will be covered.
But each year brings new discoveries of distant objects in the outer solar system, each of
which seem to be pointing the way to Planet Nine.
There are so many new worlds waiting to be discovered, both right here in our solar system
and far beyond.
If you'd like to join me on the search for these amazing new worlds, please make sure
to subscribe and ring that notification bell so you don't miss out on any new videos.
Until next time, keep watching the skies.
-------------------------------------------
Oh, Kim - A Christmas message for Edinburgh Music Theatre - Duration: 2:02.
What's the matter Kim? Christmas shopping got you down? Shopping on Amazon feeling
like you're wading through a real-life rainforest? Want to keep sir David happy
this year by buying presents that won't cost the earth? Have you managed to get
anything Kim? Uncle Fred? Oh Kim, you didn't get him novelty socks
again did you? Son't you remember his rant over the After Eights last year about
how he had 'enough novelty socks to start a novelty sock business'? Do you really
want that to spoil the Strictly Christmas Special again? Oh Kim, all is
not lost: I might have the perfect solution! Kim... do your family like fun?
Laughs? Good times? Do your friends like music? Dancing? The theatre? Then why
not buy them tickets to see Edinburgh Music Theatre's production of the musical
Sweet Charity? Just go to sweetcharity.bpt.me Go on! Go on Kim don't
you remember how much Uncle Fred enjoyed being in Pirates of Penzance? There Kim,
isn't that better? Christmas sorted with time to enjoy
relaxing! Even better, a theatre ticket contains no single use plastic or palm
oil so Mr. Attenborough will be happy! Sir Attenborough will be happy. Oh Kim!
-------------------------------------------
Delays Expected for Super-Load Transport - Duration: 0:33. For more infomation >> Delays Expected for Super-Load Transport - Duration: 0:33.
 -------------------------------------------
164m² The Beautiful Small House For Small Family In Quebec | Tiny House Design - Duration: 3:06.
164m² The Beautiful Small House For Small Family In Quebec | Tiny House Design
-------------------------------------------
Architectural And Beautiful Living Space For A Happy Home That Is Zx100 - Duration: 3:56.
Architectural And Beautiful Living Space For A Happy Home That Is Zx100
Không có nhận xét nào:
Đăng nhận xét