are you guys looking to start your painting adventure and you just got a
new kit for the holidays and you're ready to dive into those oil paints I'm
gonna show you in this really quick paint along where to start it's perfect
for beginners and for kids out there so let's take a look hey guys Wild4Games
coming at you from my creative control playlist where I bring you the
best tips tricks, tutorials, and even paint-alongs like this one right here
that we're gonna do I've been getting a lot of messages from kids and beginners
about what's the easiest and best way to get into wet on wet painting a lot of
people are scared of doing mountains or trees or clouds and things like that and
I completely get it when you get your kit it basically teach you how to do a
painting from beginning to end and encapsulate a lot of things and it can
kind of deter you from doing that and I don't want to do that I want to make
sure you guys have a nice easy painting so you get a lot of boosted confidence
so you keep tackling it over and over and we're gonna do that right here right
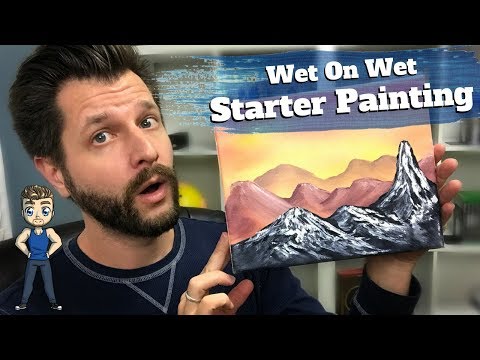
now I'm gonna show you how to paint on a little baby canvas here but feel free to
use whatever canvas size you want I just have this because I think this would
look great in a bathroom or a hallway all we're gonna do is just a basic sky
and a couple of rolling hills and you're gonna nail the basics but please excuse
my room here I'm rearranging things so that way I can have a better streaming
setup coming up in the new year here so let's go over to our canvas and our
palette and let's show you what we're gonna need to actually accomplish this
painting okay let's talk about the colors that we're gonna need you're
gonna need some cadmium yellow some alizarin crimson some Van Dyck Brown any
shade of black that you have and white and to start off our painting we're
actually gonna start mixing two colors right off the bat we're gonna take a
little bit of our red and we're gonna take a little bit of our brown and
that's gonna be our mid-tone color and then we're gonna do the same thing with
a little bit of red and a little bit of brown and a little bit of white and
there we go alright so for this painting the tools that you're gonna require are
a one-inch brush a two-inch brush a number three fan brush and at the end
if you may or may not want to put some snow on a palette knife to start with
our painting we're gonna add a little bit of a yellow accent and we're gonna
start from the very center of our painting and work all the way out and
yes we're gonna work out all of the canvas which you normally wouldn't do
you would normally does gain designate where you want your horizon line and
kind of stop around there but we're doing something a little different since
it's a small canvas all I need is a little bit of cadmium yellow on the
corner of my brush you can see I just have it right there my canvas is already
liquid white ready and wet and good to go
can see right there on the ends of my fingers that I'm already good so we're
gonna start spreading out our color it's gonna do a little bit of zigzag and new
motions here so wherever your first stroke is is where you dedicate the
light source and I'm just gonna start working out
and that's it and now I'm gonna keep this same dirty brush and work into my
red just dab it right in mix it on the brush and make sure you don't mix it too
thoroughly because we want different strikes of orange and red to come in on
here and we're gonna work at the corners and work our way in
but don't eliminate all of the yellow or all the white to do that make sure you
kind of outline what you're doing there and same strokes
I want a little bit of a darker side over here so I'm gonna take a little
more red and just cross it in I'm just gonna pigment it up a little bit and the
same thing in this corner who's gonna add a little more red from here I'm
gonna take my almighty 2 inch brush and I'm gonna blend in all of my colors I'm
first gonna start up all of my yellows blend my yellows into my Reds and I'm
gonna work from my Reds all the way out so make sure you start your yellows if
you don't start at the yelling you start with the red your Reds gonna take over
your yellow really fast and everything she's gonna become of like an orange and
you're gonna lose that beautiful color so just blend this down and in see how
that beautiful yellow is nice and soft now now we can work all the red into the
orange and then straight into the dark Reds as we go so let's just go down here
and blend and all I'm doing is there's literally cross strokes there we go and
then any excess color that I have on the paintbrush you can easily just tap out
on a paper towel just like this work out all that excess color and then we can go
down here and put some finishing touches and go all the way across
and any part you don't like just slowly just bait them into the background there
and there we've got a beautiful little like Arizona sunset desert now we're
gonna put in our first rolling hills and to do that we're gonna use our number-3
fan brush and we're gonna go into that first kind of lighter mo color that we
first created on our pallet so make sure you load up that fan brush there on both
sides and we're basically painting only with the corners there to create a nice
outline edge for our rolling hills so it's up to you as the artist to decide
what side you'd like your Hills to start on and how much definition they want to
have since these are gonna be way way way back in the distance don't give them
really high peaks kind of make them rolling and they're not gonna have a lot
of definition so make sure you don't spend too much time in thinking about
how to put peaks and valleys just kind of go with it
when you have the basic outline just start pulling color down ever so
slightly we want to make our next mountain hill is going to go around here
so wanna make sure we have enough to separation between where the color fades
and the colors that we have behind on our base poked through because it's
gonna add beautiful little shines coming through our Hill when you've got your
color all laid out use your fan brush and use all the bristles the corner and
the flat sides to start shaping in in my mind my highlights are from my right
being right-handed makes a lot easier so start forming your Hills by adding a
little bit of use into them and these and that's what creates a little bit of
Peaks that pops through now we're going to take a clean 1 inch brush and
normally you would take your brush and pull down the residual color but I like
the shading that I have here so the purpose of a 1 inch brush that we're
gonna use is we're gonna use all of these bristles here to pull down and
fluff out the bottom base of our mountain only and it's gonna help shape
so following this follow in the direction of your mountain a wants to
curl and curve down into and this is what's going to give it a lot of body
and then when you're done you can brush the bottom base of this or even give it
a little bit of a tap so you can create more of a mist of diffusion anything
like that create separation if you have too much color
I recommend tapping and fluffing up just a little bit and since this is a
background mound it doesn't need to have a lot of detail or anything like that it
is so far awake we can just barely see it off the edge now if there's same
dirty brush here we're gonna go into that medium brown color that we made
earlier so make sure you load up the fan brush just like we did before but use
that medium color and remember as things get closer to us they get darker also
you want to make sure you add contrast between your layers that way it creates
depth within your painting so we just repeat the same step except all we're
gonna do is use our fan brush here and we want to make sure we don't leave a
big gap between our first row of mountains in our second so make sure
that you kind of cross over a certain pass but don't over exert how much
pressure you put because you don't have big blobs that show out from your fan
brush here because it slowed with a lot of paint so again remember to paint with
just the corner of your fan brush
and as you can see we left some spots here where the Sun shines through on the
backside and that's what creates the illusion of depth for our painting here
take the fan brush you are just using go ahead and give it a nice clean off and
make sure you take it through a paper towel and we're going to start shaping
in our mountains now to give a good lay of the land
now if you wanted to you can leave your mouths just like how they are they like
beautiful and gorgeous and they have some shape but if you want to add a
little more of a definition to them or give them more of a 3d pop what we can
do is we can put a little bit of white on this side and a little bit of dark
color on this side so all I need to do is just use a little bit of white and a
shadow color so let's go ahead and do that so here I've got just a little bit
of white on my paintbrush and I'm gonna be again using the corners of my brush
and it's adding in and squiggling it a little bit of highlights on certain
sides now again these are distant mountains so I don't put too much
definition into them
when you got your Hill the way you like it let's put a little bit of a shadow
side on there just to make things extra pop just take the color that we were to
use and we're gonna lightly scribble it in and spots where you think it can be
use a little bit of like a crevasse or a nice little rocky shadowy spot
when you got your colored late in where you liked it again clean off your fan
brush and just fade in and feather out parts you don't like or blend them in
however you like like down here I've got a little too many hard streaks so I'm
just gonna blend it in just very very lightly but I want to keep those dark
shadow spots all right last step is we're gonna put a
silhouetted mountain out here in front and to do that we're just gonna use
straight black so load up that fan brush nice and thick with all that black and
think about how you want to put your piece now now that we're pretty close
you can start adding higher peaks and lower valleys as we go through so you
can even cover up some of the painting that we've already created here
now you have two choices here you can use the same technique that we used on
the mid-ground mountains and kind of start shading in certain points or you
can even make these mountains a little bit smaller
and you look fine it looks like you just have like a silhouetted out mountain on
the foreground there you could have a little bit of Hills here with some white
and leave the other side dark and it looks great but if you're feeling up to
it you can grab your pallet knife and we can start to add a little bit of snow in
here just for fun and I kind of recommend that because that's gonna be a
fun way to start doing this painting if you guys having a chance to see how to
do snow in a mountain make sure you check out my other video I'll put a link
in the top right hand corner there for you but let's just add a little bit of
detail here for fun and I'll probably speed up the video just a little bit for
you guys
hey guys thanks for watching hopefully you guys try this one and if you do make
sure to send me a picture of what you accomplished on Twitter or Instagram all
the social media is below feel free to follow me I hope you guys enjoyed this
one and it's a very simple ping I knock this out in like five to ten minutes
obviously you can take all the time in the world you want when you're making
your mountains and your hills and you're rolling them in and blend your colors
but I just want to show you guys a nice leaping off point that's gonna give you
a lot of confidence because anyone and I mean anyone can easily produce this
painting right here and it's gonna look fabulous no matter where you do it what
colors use where you put it and all the things like this because like this video
go ahead and make sure you follow me keep up with me on Twitch and Twitter
and I will see you guys in the next painting tutorial video next time take
care guys have a good one peace


 For more infomation >> How Sports Journalist Lesley Visser Changed The Game For Female Reporters | Megyn Kelly TODAY - Duration: 3:51.
Không có nhận xét nào:
Đăng nhận xét