In this video I'm cutting plywood, getting familiar with 3D printing and once again working
with beautiful black oak veneer to make a small sound machine/audio player based on
a RaspberryPi Zero W and a tiny HiFiBerry AMP.
Sofware side of thing is managed by Volumio and you can interact with it either through
a 4" WaveShare touch screen, Volumio's web interface or a dedicated mobile app.
I made this for someone very special – my newborn son – by far the most ambitions
long term DIY project I've taken on, who also happens to be the reason why I haven't
been able to upload videos for a while.
Without further ado, lets go over the design and components I've chosen for this project.
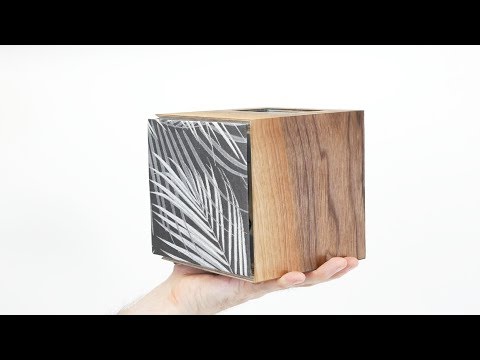
The cube measures a little under 15 cm along the edge, it's made of 10 mm thick plywood
and it's covered with a black oak veneer – the very same I used when making a jukebox
a while ago since I wanted to have a somewhat matching set.
Two coaxial speakers rated for 10W each are powered by HiFiBerry miniamp.
It puts out only 3W per channel, which isn't a lot, but the best thing about it is that
it doesn't need an external power supply.
The screen is the original WaveShare 4" IPS display, not a cheap knock-off that will
break rather sooner than later.
It's 800x480, and it connects through an HDMI to send video signal and GPIO for touch
input and power delivery.
Since I have two components connecting through the GPIO, I used an expansion board allowing
me to connect both.
Before I did that, I checked which GPIO pins are used by the miniamp and the WaveShare
display making sure there will be no conflicts.
I started from cutting the plywood.
Using a powered miter saw with the baby in the very next room was out of the question
so I used a hand operated angle miter – if you know how this is called, feel free to
educate me in the comments section down below.
After cutting three pieces at 45 degrees for the top, bottom and right side, I cut the
left and front parts where the speakers go.
I cut openings for speakers using a hole saw.
Next, I drilled pilot holes in the top panel and cut opening for the LCD display.
I wanted for the display to be almost flush with the surface.
Initially I was going to cut the opening a little smaller and use a router to take out
some material and make room for the PCB.
But since I have to limit the usage of power tools, I decided to 3D print an insert for
the LCD screen.
Modeling parts for 3D printing is something a little different from what I'm used to
as it requires much more precision.
I printed the insert in PLA on the Creality Ender 3 printer that was sent to me by my
good friends over at Banggood.
I ditched the first print due to a minor design flaw that I tried to address with a dremel.
After a few modifications I sent it to the printer once again.
It still didn't come out perfect but good enough so I fixed the insert in place and
put some fiber filler in all cracks.
Once it was dry, I sanded the box thoroughly preparing it for applying veneer.
I spread a layer of contact glue on both surfaces, waited 15 minutes and put the two together.
I cut the excess of veneer using a utility knife, carefully sanded the edges and repeated
the drill with the two remaining surfaces.
Next, I printed the front cover that's actually split in two parts.
It took 6 hrs each to print and since I'm still learning I did experience some warping
on the first piece that I tried to fix by heating it up and forming to desired shape.
Printing the other piece with a brim seemed to limit the warping.
Initially I wanted to attach the front on a set of posts, but eventually I ditched that
idea as these posts turned out to be too fragile.
I glued both parts together and cut fabric that I bought for my previous jukebox.
I fixed the cloth using a special, fabric glue and trimmed the excess of the material.
To attach the speakers cover I 3D printed a few stand offs that screwed into the plywood.
Next I designed a support structure for the Pi Zero, GPIO extender and the HiFiBerry miniamp.
Once it was ready I started the assembly which due to very confined space wasn't exactly
a walk in the park.
The LCD screen went in first, fixed by a set of wood screws.
Next I attached the frame and screwed in the Pi Zero with the gpio extender and the mini
amp and connected the touch display wires to the gpio pins.
Then, I fixed the speakers in place – it was really tight inside, with the magnets
clearance measured in tenths of a millimeter.
Finally, I attached a set of rubber feet, applied some wax onto the veneer and attached
the front cover using as little glue as possible so I can take the cover of and disassemble
everything if need be.
With the hardware part more or less complete I moved onto installing software.
For audio projects I always go with Volumio, which is free and has a few useful features
such as touch display support.
I downloaded the installation image file and used win32 disk imager to write it onto a
mini SD card.
I popped the card into the Pi Zero and powered it on.
After the Pi booted up, I connected my smartphone to the wifi network broadcast by volumio and
went through the initial setup.
When doing that, make sure to select the i2s audio output and choose HiFiBerry DAC as the
playback device.
Once the Pi connected to my wifi network, I entered playback options and enabled the
software volume control.
Next, I installed the touch display plugin... for some reason it froze at 70% but claimed
that the plugin installed successfully.
The 5 inch display would have worked out of the box, but the 4 inch version needs some
tweaking as it defaults to portrait mode.
First, you would want to enable the SSH access.
To do that, direct yor browser to your volumio instance / dev and click 'ENABLE' in the ssh
access section.
Connect to your Pi using Putty or your SSH client of choice.
Login in using default login credentials - volumio/volumio.
Go to the boot folder and edit the config.txt file.
I'll have this part covered in the description or on a website – it should be more convenient.
One more thing left to do was calibrating the touch interface as after installation
the x and y axis were inverted.
A few linux spells and a quick config file edit later everything was in order.
Some mandatory constructive criticism – the LCD cutout is a bit off – this is due to
fact that the display was supposed to be oriented differently, but during the assembly it turned
out that the HDMI display cable wasn't long enough to connect the screen to the Pi and
I had to rotate it.
So far, my 3D prints leave a lot to be desired, especially when it comes to strength of 3D
printed parts... but I do like the concept a lot – you can fabricate various parts
without power tools and all their implications such as noise and mess involved.
I'm working on my Ender 3 review so stay tuned if you're not sick of those.
The front cover would actually look better if it was flush with the box, with no gap
and I might actually redo it sometime in the future.
I also have to design and print the back cover so the cat doesn't reach in and pull out all
the wires... he loves those.
And last thing on improvements list is changing the style sheet – to make the buttons larger
and easier to interact.
Well this is it for now.
Thanks so much for watching and once again – sorry for not publishing for so long,
oobut family comes first and that little guy didn't have the easiest start into his life.
 For more infomation >> Amber Alert issued for 12-year-old abducted from Reagan National airport - Duration: 1:07.


 For more infomation >> Travel Activities For Kids - Duration: 7:41.
  For more infomation >> what to eat for HEALTHY SKIN - Duration: 3:22.
 For more infomation >> Amber Alert Issued For Abducted 12-Year-Old Girl Last Seen In Va - Duration: 1:15.
  For more infomation >> Fall registration open for Fall Youth Sports in Augusta - Duration: 0:35.
  For more infomation >> Grieving Miami Gardens Family Appeals For Help In Finding Young Father's Killer - Duration: 2:56.
  For more infomation >> Polk County deputies looking for second suspect in deadly early morning hit-and-run crash - Duration: 1:56.
 For more infomation >> Man sentenced to 8 years for stealing identities of senior citizens - Duration: 2:15.
  For more infomation >> 'Madden NFL 19' game blasted for omitting 'Colin Kaepernick' from soundtrack - Duration: 2:02.
  For more infomation >> Detroit police push for organ donation - Duration: 2:44.
 For more infomation >> NEED FOR SPEED: CARBON - BÖLÜM 30 - DEVILS CREEK PASS NASIL OYNANIR? - Duration: 2:39.
Không có nhận xét nào:
Đăng nhận xét