this is a three-button transcription foot-pedal featuring rear pivoting
buttons and a USB interface I thought this was a pretty good score at a thrift
store now I'd pick this up because I figured I
must be able to come up with some kind of use for it and gee would have made
sense if I'd started using this when I started adding subtitles to my YouTube
videos but that would have made too much sense but anyway I finally have a use
for it and I'm really looking forward to getting it implemented because I
recently got a new USB microphone to use to make my videos this was a Marantz MPM-2000U
a USB condenser microphone unfortunately yes you heard me right
this is a USB microphone so I can't connect it to my camera while I'm
recording this means that I have to use a computer to record it while I'm making
my videos which sucks but it also means that I have to start recording on two
different devices now which brings me back to the USB foot pedal I want to use
this to control audio being recorded by my computer while I'm filming I figure
if I can control it as a foot pedal I'll be more likely to remember to actually
do it and not screw up all the audio in my videos but that means I need to do
some custom configurations in Linux now before we get started setting this up in
Linux I just want to point out that even in Windows here this device just shows
up as a regular human interface device not as a keyboard and it doesn't do
anything by default so what I'm about to show you how to do in Linux you would
still have to do something like in Windows to be able to make this do what
you want before we get started setting this up in Linux I want to let you know
that I've created a github repository with a much more detailed set of
instructions so if you have a difficult time following along with this video or
just want to be able to see exactly the commands I'm running go check that out
I've put a link in the description to it so the first thing we're going to do is
create a new udev file that will be loaded by the operating system that says
how our device will be configured we're going to go ahead and add this line to
the file and the parts that are the "YYYY" and the "XXXX" we need to replace
with the USB vendor and product IDs now we can get those by running an lsusb
command with the device connected and then looking for
something that looks like what our device would be reported as so in my
case it's obviously a foot pedal so we can assume that's it now these two IDs
are what we're looking for so I'm gonna go ahead and copy those then I'm gonna
go back and edit my file and put those in there now I just copied and pasted
these values in here but you can't actually do that because these need to
be all caps for udev to recognize it to work properly so make sure you update
it like that so that's what I need to identify my foot pedal to Linux go ahead
and write and quit that now the next thing we need to do is figure out what
the event number is for our device so I'm going to do "ls /dev/input" and from
here we can see we have several event files now these are just virtual
interfaces to the hardware itself so we need to figure out which one of these is
mapped to our input device it's easiest to do this by using the by-id folder so
we can look through here and we can again find something that looks like my
foot pedal so what we're going to do is do "ls -l" which will tell us where
the file is actually located because everything in the by-id folder is a
symbolic link so we can see the foot pedal is event 21 now the actual event
file there doesn't really matter all that much because you can also just use
the symbolic link for the next step either way works I just tend to work
with the event number files now the next step is actually going to be figuring
out the scan codes for your generic input device so we need to figure out
what those are so we can remap them now that we have the event file location we
need to figure out what these scan codes for your generic input device are so
we're going to run an evtest on it to figure out what these scan codes for
each individual button are so once we run that we'll see it's brought up some
generic information about the device and we can see it is my VEC USB foot pedal
now I'm going to press every button on the device that I want to remap so left
button middle button and right button so we can see that my devices scan codes
are 90001, 90002, and 90003 so
those are the scan codes I'm going to remap to regular keys now we can quit
this and go back to the hardware device rules and we're going to add the
information about what our scan codes are the way these work is you need to
have the "KEYBOARD_KEY_" scan code to identify which
keys you want to remap so if you had different scan code numbers you just
replace that part with what yours is since mine were the 9000# numbers I
have to use these and that's just about everything you need to know to be able
to remap this so what we're going to do now is set this to some standard keys so
this is all you have to do we can set this to say "a" we can set this one to "w"
and we can set this one to "d" so that's it that will allow us to remap the
buttons on my foot pedal to standard keyboard keys let's go ahead and save
this file and now we need to reload the configuration to update the system so
there are two commands to do this and once all that's done we can start
pushing buttons on our device and have them show up as custom keys now these
particular keys I just bound are, well, standard movement keys in video games
so let's go ahead and try out using my foot pedal for a character movement in a
first-person shooter
I think that pretty well demonstrates how even just a simple three paddle
device like this could be used for accessibility for something like gaming
now while it is useful to be able to bind specific single keys to the buttons
it's somewhat limited still we can't do macros for doing more complex actions in
different software such as what I want to use Adour now Adour would be
just fine with the single button mapping except for the fact that in order to
record you have to push shift R to start the record feature so simply pushing R
or space isn't going to be sufficient and every time you go to start a
recording you have to push that after you stop recording its unselected so it
doesn't work I need a more complicated key mapping we're gonna go back and edit
our udev configuration file again but this time we're gonna change the keys
from just standard keys like you might expect to see to more peculiar ones I'm
going to set it to f16 through f18
these keys do technically still exist in the scan interpretation software they're
just not put on keyboards anymore so we can use those to our advantage because
you're not likely to need to be able to press those keys in any of the programs
you use what we'll do from here is create some kind of mapping for those
keys to depress key shortcuts or combinations now I'm going to show you
two different ways you can do this one way we'll be creating a script that
reads the key presses and then running commands to press key combinations and
the other is xbindkeys which will automate the process and make it a lot
simpler to set up but doesn't give you as much control with what you can do
with it so first let's look at the script solution in the github repository
I've included a file that demonstrates how you can set this up so let's go
through how this works so first we have this really long command that sets a
variable called id so the first part of this command
is running "xinput list" which gives us a list of all of the X server input
devices we can see here that my foot pedal is device 18 now we need this
number so we can identify it with the "xinput test" command we're going to be
using that reads key scan codes from a device now from the"x input list" we get
this really long output that can't be easily put into a variable so the next
few commands are simply just stripping away everything except for the ID for
one particular row so what you would need to do if you wanted to use this
file yourself is change out where it says VEC to something else unique that
identifies your device in the "xinput list" then the rest would take care of it
for you and you'd get the ID back after we get the ID we just print it out to
ensure that it's working once you have the X input ID we're going to go through
and read each line that the command "xinput test" spits out so when we run the
"xinput test" command for my device which is ID 18 and I press the buttons on the
device we can see that we get a different output for each one when it is
depressed and released now the depression and released outputs aren't
quite true it's doing a virtual key press so I'm still holding the key down
and it continues to output release signals which aren't really that helpful
we would have to get a little more complicated and use evtest to read
the key inputs which is doable but but just a little more complicated but let's
continue with this so we can see here that we have the key presses with the
numbers and we are going to go ahead and read those in the file up here so every
time a new line comes in it's put into the variable in and then we check if
that line equals one of these lines and when it does it just runs a script with
a parameter that is the key that was pressed now if we look at the inputAction.sh
script here we can see that we save that parameter to a variable called
button and then we have a simple if statement tree for each button
possibility that we would want to handle inside of the if statements we have
another command called xdotool this is a tool that allows you to send virtual
key presses to the X server you will need to install this to be able to use
it in your screen but to use it all you have to do is
"xdotool key" and then the name of a key to be able to send a specific key press
there are more complicated commands such as keydown and keyup
that you may want to use if you're going to send a more complicated key sequence
but if you don't need to press certain keys in a specific order then you could
probably get away with just the key option now the names for the keys used
with xdotool aren't necessarily the most intuitive things and you may have a
difficult time figuring out which is what now in order to figure out what key
names you need to use with xdotool you may want to use another program called
xev with it you can just depress any key on the keyboard and it will output the
name of the key that you pressed here so for example page down shows up as next
and page up shows up as prior so that's why I had to use those names in my
script or blender so this set up here is actually for blender we have next which
is actually page up and prior which is page down bound to the outer buttons on
my foot pedal and then alt a is the blender shortcut for starting playback
of the animation so with this set we can close this run keyListen.sh and now every
time I press a key something will happen so let's go ahead and open a blender
project and see how that works so if I push the buttons on the sides of my
pedal then it will skip forward and back over the tracks in the VSE
and if I push the center pedal it will begin playback and then I can push it
again to pause it then we can just close this script by hitting ctrl C and that's
it so that's how you can set it up with a script to be able to read the key
inputs now let's look at how you can do it with xbindkeys now to set up xbindkeys
first you're going to need to install it with the simple apt-get
command but after you do that you'll want to run this command which will
create a default configuration file in your home directory after you've created
the initial configuration file all you have to do is just edit it and then you
can put in the keys that you want to respond to these are what I've added
after the default example one it has here we can actually comment this out
because we don't need that so I'm running the "notify-send"
command which just lets you have a notification pop up with your desktop
environment and then these are the keys I'm responding to so in the example up
here we can see that control shift Q would have run the xbindkeys_show
command but I have these weird ones well those weird keys I'm using are
actually the scan codes for F16 through F18 if we run "xinput test" again and
press our keys we'll see that those are the numbers that are being output you
can just put F16, F17, and F18 into xbindkeys configuration file but I find
using these scan codes to be a little bit more precise when you're using
really weird keys like this once you have a configuration file defined you
can just go ahead and save it but then you need to start xbindkeys now if you
want to xbindkeys to run every time you start your computer you can also do auto
start it as a separate command that will configure it to start up every time for
now let's just go ahead and start it and I'll press a key on my pedal and you can
see in the upper right I got a notification that I pressed the middle
pedal now I'll press the left and the right so that was a very easy setup for
getting commands to register from key presses just like with the custom script
we did you can use xdotools with xbindkeys to send a single command of a
shortcut key or you might be better off using a separate script like inputAction.sh
that interprets those key signals into other key combinations xbindkeys
can only output one single command for each key press well I think that's
everything I wanted to cover about setting up a custom input device in
Linux I hope this information is useful to people especially if you're trying to
set up an accessibility device I could see these foot pedals which are like 20
bucks used on eBay being very cheap easy options for people
who may not be able to use their computers in the traditional ways or
maybe you just want to be a power user or like me have a situation where you
can't normally access your mouse and keyboard and it's just more convenient
to set it up like this either way I hope that was useful and I'll see you next
time
 For more infomation >> Sabrina Cruz's 5 tips for surviving your first year at U of T - Duration: 2:18.
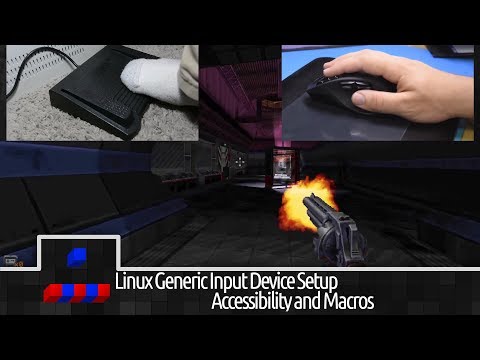
 For more infomation >> Trade deal a win for US and Mexico? - Duration: 3:19.
  For more infomation >> 70+ Ways To Recycle Old Furniture for Garden | Garden Ideas - Duration: 10:13.
 For more infomation >> 9-Year-Old Boy Kills Self After Being Bullied For Coming Out As Gay, Mom Says - Duration: 0:46.

 For more infomation >> Ravens Trade Pass Rusher Kamalei Correa to the Titans for Draft Pick - Duration: 1:48.
 For more infomation >> Donald Trump Returns Flag To Half-Staff For Sen. John McCain After Backlash | Velshi & Ruhle | MSNBC - Duration: 6:44.


 For more infomation >> Washington teachers hope for new contracts - Duration: 2:14.
  For more infomation >> Cloudy Morning for the Central Coast - Duration: 2:42.
Không có nhận xét nào:
Đăng nhận xét