Hello Friends!
It's Kat, from MeowMeowKapow!
If life were an episode of Dragon Ball Z, this is where I would say "Previously on
MeowMeowKapow" and roll a dramatic highlights reel of parts 1 and 2 of this series.
But we don't have time for that!
Check the i-card and doobly-doo for more info on our journey thus far.
Let's get this final showdown under way!!!
Given that I've been specifically testing these brush pens for their usability with
watercolor, it seemed pretty obvious I should paint something.
Per usual, I made doodle finders with each pen, waited for them to dry, and then used
my Daniel Smith watercolors over them to see how they interacted.
Oh, and I used Canson Montval watercolor paper for this.
Also, it was requested that I show whether or not these pens feather or bleed on watercolor
paper.
For sure, they don't do either.
Each pen has its own unique texture along the edges of the line they make, but that's
partly due to being used on cold pressed paper and partly because I intentionally used these
pens exactly how I would in real life, which is not especially delicately.
One curious thing that someone mentioned in the comments of our last video, was something
that I'm glad I was aware of beforehand because I would have thought I was crazy otherwise.
The Pentel Pigment brush pen noticeably rejects any watercolor that comes in contact with
it, which is mostly resolved by running your watercolor brush over the ink a couple more
times but looks kind of like a mess initially.
Aside from that, our initial test didn't show anything that we weren't already aware
of, though it did slightly intensify any opinions I already had.
For instance, I mentioned in the first video that the Lictin pen's long, thin tip made
it a bit difficult to control…. and after having tried twelve different brush pens in
a row I can confirm that its flimsy point is still difficult to control.
Also, having three different pens with the Pigma set does technically mean that you can
make any line width you could dream of, but it's also kind of a pain to switch between
the three pens, especially because it's not immediately obvious which one is which.
The extreme firmness of their points also makes it a bit difficult to judge exactly
how much pressure you need to get what you want done, and each individual brush only
has a so-so line variety on its own.
Both the sigma and the lictin have already been eliminated from the running early as
the champion of this fight, but I'll still put them through the full gamut of tests for
those of you curious.
Thinking about how the Pentel brush sort of caused watercolor to run from it, I started
to wonder how the pens performed with other mediums.
For the following experiments, I switched over to my Canson XL watercolor paper since
it's cheaper and works just fine.
I decided to do a couple extra quick tests to see how they worked with watercolor and
gouache, both being applied on top of those mediums as well as having those mediums applied
on top of the pen.
Unsurprisingly, they all performed as normal on top of both watercolor and gouache, but
the Pentel brush mildly rejected both watercolor and gouache being placed on top of them.
Also, the Zig mangaka brush pen smudged when watercolor was put on top of it.
I only waited five minutes after applying the ink before doing these tests so that tells
me that the zig ink likely has a longer drying time than some of the other pens.
How long, you may ask?
Well, I did tests with each pen to determine their waterproof drying times.
We already know their smudge-proof drying times from our last two videos, but it turns
out that three of the four pens are completely waterproof within one minute of application.
It took the zig mangaka #24 brush pen twelve minutes to completely dry and be absolutely
waterproof.
This long dry time has me a bit worried, because if you were to use the pen while Oot and Aboot
for some urban sketching, you'd have to either paint first and apply the ink after,
or wait at least twelve minutes after finishing your inking to start painting.
Also, out of curiosity, I decided to see how these pens interact with alcohol markers.
I don't have a lot of alcohol markers, and what I do have are these kind of old Winsor
& Newton ones that are sort of running out of ink.
However, they were good enough to let us know that these pens for sure aren't meant to
have alcohol markers used on top of them.
I thoroughly cleaned the markers between each swatch here so they definitely all smudged
on their own.
Thinking about the two pens that I consider to still be in the running, the Pentel Pigment
brush pen in extra fine and the Zig Mangaka #24, I know which one I prefer… though I
think it may sound a bit crazy.
When it comes down to it, the Pentel brush is technically the best one of the lot.
It scored highest in every single test we put it through.
Though there were two things that weren't on the initial rubric that I think have more
points attributed to them than anything else.
One is intangible.
It's that feeling where even though you know it's not logical, you like something.
Like how your favorite video game might be special to you but everyone else on the planet
things it's hot wet garbage.
But the other is control.
The Pentel brush is capable of making very thin and very thick lines in a wide range
of smoothness and texture…
But I never really felt like I was in control of the brush.
Its super long, super thin point meant that I would occasionally have the tip flick out
in a direction I wasn't expecting and there would be just a tiny moment of frustration
despite each line still looking great.
I tried to use this little test to show what I meant, but of course, this technically superior
brush still produced great results.
I'm telling you though, in your hand it does feel a little like a wild card.
So my gut keeps telling me over and over again that the Zig Mangaka #24 pen is the best,
and my favorite.
But when you look at the lines I got in this control test, they're not as thin and delicate
as the pentel brush.
Plus, there's the dry-time issue to consider.
And the fact that it's literally the most expensive single brush we got, at $11 a pen.
But I still love it.
I prefer the matte finish of its ink to the slightly glistening finish of the pentel pen,
especially for filling larger areas.
I think the ink flows a bit smoother from the tip and glides across the paper in a satisfying
way.
Plus, it doesn't reject watercolor being put on top of it and that was kind of the
whole point of this series-finding the best premanufactured brush pen for use with watercolors.
Let's be clear here though, the Pentel brush is technically better.
I just don't love it as much.
For sure though, I think it'll become my travel brush pen since the super fast dry
dry time is definitely important out in the field.
So, there you have it.
After being put through a series of tests, forced to battle against 11 competitors, and
used repeatedly over the course of a month, the Zig Mangaka #24 brush pen gets the official
MeowMeowKapow seal of approval as best brush pen to use with watercolors.
But the Pentel brush pen was basically robbed.
What do you think?
And what should I put through an ultimate showdown next?
I've already got a couple of ideas but want to know what you'd like to see.
And if you'd like to help fund these epic experiments, I set up a Ko-Fi account in my
doobly-doo.
Anything you donate will go directly towards more investigations like this one!
Thank you so much for all your ideas in this series, if you'd like to see more please
remember to like and subscribe to help support this channel!
Until I see you next time, I wish you peace, love, and ink flow.
Bye!
For more infomation >> Best brush pen for watercolor artistst-ultimate showdown finale! Pt. 3/3 - Duration: 7:37.-------------------------------------------
What Bodybuilders Eat For Breakfast | How Fouad "Hoss" Abiad Starts His Day - Duration: 6:08.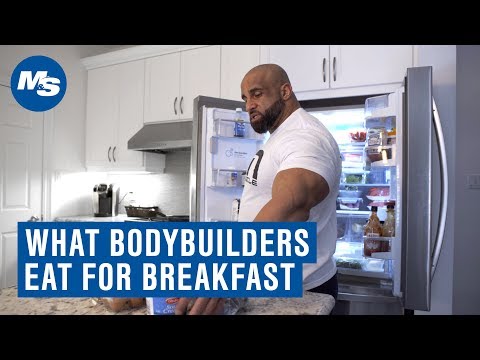
it's a cliche but you have to eat big to get big I mean it's it's a simple fact
every meal counts how's it going muscle and strength fans I am Fouad Abiad
IFBB Pro and you are in my kitchen and we're about to make my breakfast so
you guys can see how I eat to fuel up for today's workout I can't eat the same
shitty bland food day in day out so we just went shopping so the fridge is
stocked we're gonna go with some egg whites some fulll eggs and we need some
cheese sour cream actually leave the sour cream out
go with some ketchup Mayo I cook everything with like Pam cooking spray
or any cooking spray so we'll get the eggs started
and since I'm in the offseason I'm gonna probably do a little more carbs than I
would normally so this is cream of rice do 1/2 a cup cream of rice is about 80
grams of carbs fiber can be a nightmare at times if you're trying to eat a lot
of food so for me I found that cream of rice cream of rice instead of the
oatmeal just digests faster and I can I can just get through more food that way
I'm not going to measure this time normally I have my measuring cup out but
I know there's 8 egg whites there so that's that
you know I know everybody has their own philosophy about it and some people say
you know the organic thing is just bullshit it's just to make you just to
make you spend more money and so this is a marketing ploy and all the stuff that
might be true I mean you never know I choose to err on the side of caution so
today we're gonna do breakfast burritos each of these tortillas have 30 grams of
carbs so there's 90 grams right there and then I got another 80 grams in the
microwave so my breakfast will consist of about 170 grams of carbs
I'ma eat six meals a day the breakfast is usually the highest and carbs and the
lowest of protein cause I only got about 50 grams of protein in that egg in the
egg meal so I'll just add a little bit of cinnamon you need our fat so I know
there's fat your saturated fat in the egg yolk but I don't feel like that's
enough so I'll do a heaping teaspoon which is but more like a tablespoon of
peanut butter natural peanut butter it's not like jiffy or Kraft or any of that
garbage I'm gonna have oatmeal or cream of rice all sweeten it with stevia now
the only other thing I had to that
frozen blueberries
it's a cliche but you have to eat big to get big I mean it's it's a simple fact
every meal counts if I eat all my meals and they're all like this heavy in
calories I will gain weight which is what I want but if I miss a meal the
next day I'm lighter I think in the offseason when you're trying to grow you
need a surplus of calories and you need a variety of nutrients but if my fat
level on my body isn't overboard then I feel like I can do this
a couple times a week it's two ways to go about it you can eat perfectly clean
and then binge one day a week and have whatever you want
or you can do it my way which is give your body a little bit of something
every single day so it keeps it interesting it's got to look good to
taste good I used to be a chef believe it or not it doesn't look like it
anymore I think I've lost all my skills but you know I worked in a couple
restaurants
you're gonna bodybuild for 20 years I'll give you guys the number one tip to
longevity in the kitchen as far as your diet goes learn how to make stuff
taste it you know if you're eating chicken and rice learn how to make
chicken and rice eight different ways you know then you'll be able to you'll
have longevity but you're not you're not gonna eat plain chicken and plain rice
for 20 years if you learn how to do chicken and rice and you saute it with
some vegetables or you do learn how to do any any type of meal you can think of
or even make you make burritos out of your chicken whatever it's it's like you
have to have a different variety for your food I can't eat the same shitty
bland food day in day out for the whole year I'll do what I'm dieting cause it's
to serve a purpose and I have a focus in my mind but in the off season I don't
see why I should have to limit myself
-------------------------------------------
8 Crucial Tips For Successful Weight Loss Maintenance - Duration: 3:18.
8 Crucial Tips For Successful Weight Loss Maintenance
Its no secret that trying to lose weight can be a roller coaster ride.
And while it feels amazing to finally reach a healthy weight, regaining lost pounds several months (or years) down the line can be a bummer.
So how do you keep the pounds off once theyre gone? Lets take a closer look at research for some simple ways to get smart about weight loss maintenance.
Weight loss is hard enough to begin with, and it's only half the battle.
Keeping the weight off is another story.
But before you give up, consider this – according to the National Weight Control Registry (NWCR), 20 percent of those who lose weight succeed at maintaining it long term.
And while that might seem low, keep in mind that many who attempt weight maintenance lose the focus and strategy that they had in the beginning.
It all comes down to staying informed and creating a game plan.
Before you know it, you'll be part of that 20 percent.
Here's how.1.
8 Smart Ways To Keep Weight Off.
Reward Yourself.
Stick To A Consistent Routine.
Mind Your Calories. Eat Breakfast.
Stay Active. Remember Why.
Don't Go Back To Your Old Bad Habits.
Weigh Yourself.
As hard as it may seem, it helps to meet up with the scale every now and then.
Weigh in every couple of weeks to make sure you're still on track.
-------------------------------------------
Former president Obasanjo's proposed coalition for Nigeria launches in Abuja - Duration: 2:42.
The coalition is being launched at the Yar'Adua Centre, Abuja, Nigeria's capital. Obasanjo, had, in a letter, called for the formation of the movement.
He had argued that the ruling All Progressives Congress and the opposition Peoples Democratic Party were incapable of repositioning Nigeria, having lost the confidence of the electorate.
Premium Times reports that Obasanjo, who just bagged a PhD degree was not present at the launch in Abuja.
Two former PDP governors, Olagunsoye Oyinlola, a former governor of Osun state and Donald Duke of Cross River, were, however, said to be in attendance.
Oyinlola who said the movement is not yet a political party, noted that, with time and agreement with other stake holders, it could eventually upgrade into a political party. "We're not a political party, at least, for now," he said.
"We recognise the facts that by the dictates of the constitution, you can only contest on the platform of a political party.
Meanwhile, we had earlier reported that the Nigeria Intervention Movement (NIM) had commenced a drive to welcome new coalitions, groups, and others to its Third Force initiative just as Chief Olusegun Obasanjo's own version of the Coalition for Nigeria Movement (CNM) is to be launched.
Daily Trust reports that the NIM's deputy director-general (media and publicity bureau), Mallam Naseer Kura, said his group is ready to welcome new members and groups.
In a statement, Kura reportedly said events in recent times had shown the swift and positive response of Nigerians to the philosophy and message of the movement.
"This is underscored by the recent, historic statement by a former president, Olusegun Obasanjo, whose clarion call on like-minded Nigerians from different states and regions of the federation, different religious beliefs and backgrounds, groups of Nigerians from different professional and sectorial leanings should come together to create an environment for the realisation of the citizens' potentials and aspirations.
-------------------------------------------
💕 5 Creative Wall Storage Ideas for Small Bedroom 💕 - Duration: 3:27.
Your bedroom is where you find the most comfort in
so this specific place should be organized
as creative as you can.
However, it's not always easy to pare everything down
to the bone when you don't have a spacious
bedroom to begin with.
That's why I encourage you to de-clutter your stuff
with these next 5 creative wall
storage ideas that will totally fit your small bedroom
by your loyal list maker simphome.com.
1.
Going with the Basic
If you like to do a little reading during
the night then attaching a shelf above your headboard
is a must!
A mounted-shelf above your bed will totally serve
as a place to stash your books.
In addition, you can opt to install lights
underneath to give the perfect lighting.
Note that you have to attach the shelf above
the height of your head so that you won't
bump into it when sitting up.
These above headboard shelves are good to store
not only books but also things you rarely
look for like luggage and boxes of off-season clothes.
An impeccable and creative wall storage idea
for your small bedroom that you must totally
give a second thought!
2.
Wall-Mounted Cabinets
A small bedroom means less space to store
your stuff.
Instead of just shelves, those big empty space
on the wall right on top of your bed
is the perfect spot to install cabinets
for more storage.
A wardrobe often takes the most space in your room,
so install cabinets above your bed
to store your belongings that you don't use every day
like luggage or you can use them
to save your old stuff.
3.
Make Hay While the Sun Shines
See that 12 inches wall below your ceiling?
See the opportunity it offers
for your storage predicament?
If you do then the saying "make hay
while the sun shines" completely fits this situation.
You will have dozens of square feet of storage space
if you install shelves along the perimeter
of your bedroom walls.
4.
Hang Your Clothes
Number one problem for girls who love shopping
is to find space in the closet to fit all the clothes in.
It certainly doesn't help when you have
a tiny bedroom and the option of adding another
wardrobe automatically goes out the window.
That's why you need to use that empty corner
in your bedroom as a clothes rack.
This might be a good idea to have a clothes rack
on the wall because you need access to
your outfits on a daily basis and rummaging
through your overstuffed wardrobe just to
fish for one specific blouse is not what you need
especially if you are in a rush.
5.
Splurge on A Wardrobe Wall
If you are okay with spending a couple of
bucks for more storage
then installing shallow wardrobes along a whole wall
might be a good idea for you.
This will definitely add storage as well as
create a serene atmosphere if that's the
ambiance you are going for.
So, are you ready to make the most of your tiny space
with these 5 creative wall storage
ideas for small bedroom?
Come back again next time with more home,
apartment makeover, and decorating ideas.
Like this video, comment it, or better yet
share it with everyone in your social circle.
Don't forget to press subscribe button if
this channel is new to you.
See you again later and thanks for watching.
-------------------------------------------
Prayer for Prosperity | Guided Abundance Affirmations | Dr. Roger Teel (7 Minutes) - Duration: 7:17.
In this relaxing moment I breathe deeply.
Releasing the cares and concerns and perspectives of the outer world.
Relaxing my mind, my emotions, my body and opening mind and heart.
I enter into the dynamic recognition of the all abiding infinite life and love that is
God.
The Supreme Spirit.
The lavish energy intelligence and abundance of life.
the all and all infinite and inexhaustible life.
This life is all and one and only.
This life is all that it ever needs to be within itself, limitless, ever unfolding its
wisdom and possibility throughout the universe.
This life is all life, it is pure love, light , peace, truth, joy, wisdom and the abundance
of all things.
This life is unfolding itself perfectly and I rejoice in this moment to deeply know that
this is the life that I am.
My life and the life of God; One.
A seamless unity.
I am living the life of God and God is living its life as me.
I step out of the old, limiting ideas into the true spirit and light of my being.
I commune with that which God is being as me and declare with spiritual clarity "I
am life."
Inexhaustible and eternal, i am love, peace, power, joy, wholeness, and an ever unfolding
abundance of creativity and good.
Human ideas of limitation and scarcity are dissolving in this instant as I realize that
I am the outlet for the omnipresent outlet of divine life.
And now I affirm, speaking the word of truth, accepting it totally.
I affirm that abundance is the very way of life, in this realization I am prosperity,
for God, limitedness life, is my source.
I rejoice that there never can never be any scarcity in spirit or truth therefore my life
is grounded in this continuous flow of divine good.
I know and affirm that the ideas of God now pour forth into my consciousness, into my
heart for acceptance and into my world for manifestation.
I open to creative insights that open the way for the divine good of God to express
itself in and through me.
I am an outlet for the distribution of the infinite good of God.
There's nothing too great that it cannot be filled to overflowing with this good.
I praise, I rejoice in the lavishness of life and I know that this is who I am.
As this consciousness is anchored now within me, I know that flowing forth through me is
the abundance of pure being and flowing back to me is the abundance of life forms that
result from this, mirrored back to me from this consciousness is greater financial good.
Increased and wondrous opportunity, the growth and the prospering of every area of my life,
be it in body, relationships, career, every area.
My creative expression abounds.
This consciousness is who I am now.
It moves forth to take form and I rejoice and know that my word shall not return unto
me void, but that it is accomplishing that where unto I send it so the consciousness
so wide that God is pouring forth through it, I give great thanks for the good that
is mine in every way.
Moving forth through the perfection of law to evolve and manifest in all the right perfect
ways and times.
I am so grateful for the truth made known, realized and expressed in and through me abundantly
this day.
And now I release this knowing in great joy to that power greater than I am that doth
the works in peace and acceptance.
Knowing it is done unto me as I believe, and I believe.
Thank you dear spirit.
This is now so and so I let it be.
And so it is.
-------------------------------------------
Some Uses of Baking Soda for Hair, Skin and Body - Duration: 2:10.
natural home remedies 100% natural ingredients 100% safe and natural the
right way to use baking soda to get rid of acne softened skin teeth whitening
eliminate body odor and more baking soda is a powerful ingredient that can be
used in various ways like cleaning baking and skin treatment baking soda
can also treat and utilize several diseases you can also use baking soda to
keep your clothes white here are some uses of baking soda 1 get rid of acne
baking soda is an extremely effective remedy to get rid of acne and pimple
make a paste using baking soda and water then apply it on the affected areas to
teeth whitening make a combine with baking soda and hydrogen peroxide then
brush your teeth to make your teeth widen but remember that you should not
use this too often because it can also damage your teeth enamel 3 softens skin
just made a mixture with a combination of baking soda soap and water
massage it softly on your dry hands and feet then wash with lukewarm water for
relieves body odor add a small cup of baking soda in your bathtub it will the
activate the acids and bacteria that is the reason behind your body odor 5 keeps
your hair healthy and clean use baking soda as a conditioner in order to keep
healthy and clean your scalp and hair do this on a monthly basis thank you for
watching if you like the video give it a thumbs up and share it with your friends
if you want more recipes and tips subscribe to the channel to check out my
upcoming videos
-------------------------------------------
Seattle woman pushing for better care for sexual assault victims attends SOTU - Duration: 1:32. For more infomation >> Seattle woman pushing for better care for sexual assault victims attends SOTU - Duration: 1:32.
 -------------------------------------------
Hand tool woodworking D&D Display case for NERDS! - Duration: 13:05.
hello everybody this is clean Phil
wanted and today I'm gonna show you something yeah I'll give you a better
picture of it I used to play D&D with my friends back in the States and we would
go out and look for little characters in the stores that would represent our
characters on our battlefield adventure-filled whatever you want to
call it I never really liked any so I used epoxy putty and I created this dude
now he is very Oh because I was very Assassin's Creed at
that point so there's a lot of likenesses to that here he hasn't had a
proper home and really hasn't seen the light of day in two and a half years so
I'm going to make him a proper home
Still not the prettiest right there but that's ok
swell out a tiny bit when I do that (steel wool and vinegar aging)
you could keep the inside white which I think might be interesting but be
difficult as well
I finally made a proper home for my little dude I made years ago a proper
base and a proper home form now that he's been killed off for two and a half
years but this is I'm very happy with this now he is on a brass base now it's
an inch by an inch which is a usual size you use in D&D but I glued a rare earth
magnet in the center of it drilled a hole into it glued a rare earth magnet and
the center of it glued him on top flattened everything out and that's how
he stuck on there so I could use him again but I have no intentions of doing
that this actually was more difficult and I thought it was gonna be but that's
probably because I did not really draw it out or design it ahead of time and
what I did draw out I didn't really follow so I just kind of went with the
flow I would suggest you do try this if you have something you want to display
something for your kiddos and have to be a miniature a D&D thing but could be
anything hey you subscribe like and comment and catch you next time laters
-------------------------------------------
Idun Minerals Nordic Veil Foundation in Jorunn Review | Vegan Foundation for Pale Skin @phyrra - Duration: 8:47.
Why, yes, it is my bronze ambition tour today.
No, seriously, I played with a lot of bronzer, and I don't normally wear bronzer.
And this what I came up with.
Anyway, hey friends, welcome back, and hello to you new people, too.
For those of you who don't know my, I'm Courtney.
Today I'm finally bringing you the one, the only, review of the Idun Minerals Nordic Veil
foundation.
Yes, this is my holy grail foundation, and I will tell why.
I will also compare it to the original Norrsken formula.
And probably my other foundations that I like to wear, just so have more of an idea of why
this is so badass.
So in case you don't know, I'm 39 years old, I have sensitive skin.
I have Rosacea.
I have serborrheic dermatitis around the corners of my nose, the inside of my brows, and sometimes,
like right up here in my hair.
So, it can be really annoying.
What that means when it comes to makeup, is that makeup is prone to caking around the
sides of my nose, and in between my eyebrows, which can be really annoying.
Doesn't happen all the time, but it happens sometimes, especially if my skin is extra
dry.
So, you know, I try to drink a ton of water.
I quit caffeine a couple years ago because I though maybe that would help.
But I only recently in the past year, year and a half, got the diagnosis that I had serborrheic
dermatitis, and that could be causing it.
So, I also have a topical prescription, which can help with the serborrheic dermatitis,
but sometimes just nothing helps.
So, it's good to have a foundation that doesn't make my skin worse, and make it look more
cakey.
The Idun Minerals Nordic Veil foundation is very reasonably priced.
It's $28.00 for one ounce.
That's, you know, like really on the low end of department store, but is a very high quality
product.
It is cruelty free.
I do believe it's vegan, but I will double check that.
This is their more full coverage version, as compared to the Norrsken.
The Norrsken is more dewy, and more light coverage.
And I like the amount of coverage that Norrsken offers.
Nordic Veil is actually more full coverage than I prefer.
But what I do to make this work for me, is I mix it with the Hourglass Veil Mineral Primer.
This is my very battered tube of the Hourglass Veil Mineral Primer.
So, I mix these two together to basically thin out the consistency of this product,
and give me like a really nice glowy finish.
I'm wearing this today.
Now, I always set this foundation with the Laura Geller Balance and Brighten in porcelain.
And basically it helps my foundation to wear all day.
You can also use something like Pixi's Makeup Fixing Mist to basically take down the powder
and meld all of your makeup together.
Or you can use something like Urban Decay's All Nighter spray to help you makeup last
much longer.
But I do find that by setting the foundation, I get pretty much all day wear.
I've been wearing this since, I don't know, I think 11 o'clock this morning, and it's
now 9:42 p.m. at night, and I did touch up with powder, but that's really all I've done.
So, I feel pretty good about how it looks considering that I've had it on all day.
But basically the way I prefer to apply it, is I may or may not actually use the primer
all over my face.
I've stopped doing that, because I mix about 50% primer with 50% of the foundation.
And mix it up on the back of the clean hands.
I wash my hands before I ever play with makeup.
And so I'll put it on the back of hand, and I'll basically kind of warm it up, and mix
it together.
Then I'll dot it on my face.
And then I will take a damp makeup sponge.
This is the Nyx Total Control makeup sponge.
I absolutely love this.
Before this, I was pretty much a beauty blender girl.
Now, I'm in love with this sponge.
Anyway, I will use this to blend out the foundation on my face.
I really like that it has this sort of sharp edge to make it easier to go around my brows.
And to clean up along under my eyes.
Then I go to the Balance and Brighten, and I use this little Real Techniques Sponge to
basically set my face all over.
I need to get more of these.
I ordered more of them from Ulta, but they're not here yet, because this one is pretty much
on it's last legs.
It's about to die.
But it does a really great job of setting this all over my face.
I'll apply the rest of my like blush, highlighter, contour, whatever I'm going to do to my face.
Then I use something like the Pixi Makeup Fixing Mist to spray on my face.
And then, if I'm going to end up basically setting it, and I really want it to last all
day, and I'm being super hardcore, I will take the Urban Decay All Nighter, and spray
it on another makeup sponge and just basically, gently pat all over my face to make sure I
don't miss a single inch of my skin.
And then I don't have to worry about getting it in my mascara.
So, let me tell you what I really love about it.
I really love that I don't have to add white to make it a match for my skin.
It is a perfect match.
If I wear it on its own, or if I mix it with the Hourglass Veil Mineral Primer, I really
like the consistency and the finish.
I feel like if you wear it by itself, you get more like a satin matte finish, or maybe
sort of like a slightly radiant matte finish.
As I mentioned, it is a little bit too full coverage for my taste, but I'm able to easily
thin it out with the Hourglass Veil Mineral Primer.
You could probably use another primer if you don't like that one.
I really like the price.
I feel like it's very reasonable for $28.00 for one ounce.
That doesn't bother me at all.
I like the longevity, and how it looks.
It doesn't really settle into the fine lines in my eyes.
I've done a wear test with this, so you can see more of my face up close.
But let me zoom in for you.
So, if I crinkle up, you can see my fine lines around my eyes.
But if I'm just looking at you normally, you can't.
And considering that I've had this foundation on like over 12 hours, I feel like I look
really good.
So, yeah, it doesn't settle into fine lines.
It doesn't settle into pores.
It'll last at least 12 hours, if you apply it with a primer, and setting powder, which
is how I prefer to apply it.
So, let me tell you what I don't like about this foundation.
The number one thing that I don't like about the foundation, is that because it's a Swedish
Company, they only have nine shades.
I'm very lucky that this one of the very few foundations that will match my skin tone,
that I don't have to add white to.
That is a rarity for me.
If I were to walk into Sephora, I could only find two, maybe three foundations that I could
wear without having to add white.
Those foundations would be the Huda Beauty FauxFilter Foundation in Milkshake, the Cover
FX Total Cover Cream in N0, and I could at least match to the Kat Von D Lock It Foundation
in Light 41.
But I can't wear the Kat Von D foundation because it's drying and cakey on my skin.
So, I feel very grateful that I can wear this.
It works really well with my dry skin.
It doesn't emphasize cakiness, or fine lines, or wrinkles, or anything like that.
And it looks great.
It looks like skin, especially when I thin it out, like I did today.
This is, like I said, this is 50% foundation, 50% primer.
And I feel like I just look very seamless from my face to my jaw to my neck, all the
way down.
It just looks like it's all one color, rather than me looking like I have my face darker
than the rest of me.
So I love that.
But I do really feel bad about the fact that it only has nine shades.
But then again, it's not an American company, they're a Swedish company, so they have a
very limited shade range.
I did want to insert swatches for you of this foundation compared to other pale foundations
that I own to give you more of like a gauge of where it's at.
But I feel like this is a really great, neutral tone foundation, or at least it works for
my skin.
And I feel like my skin tone is neutral, or neutral leaning cool yellow, because I feel
like the things work best for me tend to be neutral or cool yellow foundations.
Huda Beauty Milkshake.
Idun Minerals Nordic Veil in Jorunn.
Cover FX Total Cover Cream in N0.
Kat Von D Lock It Foundation in L41 Neutral.
The Body Shop Matte Clay Skin Clarifying Foundation in Peruvian Lily.
The Ordinary Serum Foundation in 1NS.
And Hourglass Foundation in Blanc.
So, anyway, if you're looking for the best medium full coverage that you can sheer down
to light medium coverage, if you want, foundation for dry skin, I would recommend the Idun Minerals
Nordic Veil foundation.
If you're somebody who has really, really, really dry skin, and you need something very
light medium coverage, I highly recommend you check out the Norrsken, because the Norrsken
is going to give you a dewy finish.
Like, if you don't set this, it's just going to be dewy and sticky and come off on stuff.
And it's going to be very, very good for your dry skin, because it's not going to irritate
it at all.
It's not going to cause any cakiness.
Just this formula, is so much better for very dry skin.
But, if your skin is more similar to mine, you may love this.
I can't tell you enough my things about it, I love it.
I'm so glad that I have it.
It really is my holy grail foundation.
And I'm glad that it doesn't have, to me, it doesn't have a bad scent at all.
It has like a little slight scent.
I want to say that the smell of this is like a ... It's not really light and fruity, but
it's a very light scent that I don't even really know how to describe.
I'm trying to describe it.
Maybe light and clean would be a good way to put it.
But it's not a very strong scent at all.
If you're somebody who didn't like the Huda Beauty foundation because it has the most
disgusting fragrance ever, definitely give this a try.
Anyway, what do you think of the Idun Minerals Nordic Veil Foundation?
Please be sure to let me know in the comments below.
If you found this review helpful, please give it a thumbs up, and share.
And if you haven't already, click on that little subscribe button down below, and I'll
see you in my next video.
-------------------------------------------
50 Revit Basics for Beginners - Duration: 7:53.
Welcome to Hyperfine Academy.
Today I'm sharing the 50 things I do most frequently in Revit.
Let's get started.
Align.
Click on the first object, click on the second object.
Now your design is way better.
Array, AR.
Click on the object, AR to start the command.
I usually don't group and associate.
Type in the total number you want, including the one you have selected.
Click anywhere, drag in the direction you want to go and just type in the value you
want.
Place a component, CM.
This will be things like toilets, casework, furniture.
Up here use the search function so you don't have to scroll through everything in your
project.
Copy, select the object, CO, click, move, click.
Now you have two.
Create Similar.
Creates another thing of the thing you have selected.
Cut Profile, CX, This is drafting only, one view only, it doesn't change your model.
After you hit CX select the object you want to change.
Draw a line between the orange boundaries.
Point the arrow to the side you want to keep and hit ok.
Now the finished floor doesn't go through the gyp board.
Dimensions, DI.
See my other video.
Detail Line, DL.
Great for drafting, and other things, like more drafting.
Mirror, DM.
Select your object and start your command.
I like to draw the line.
You could also do it with MM and just pick a line that's already there.
Door.
Override Graphics in View by Element.
This has all the same visibility graphics options you're used to, but will only affect
the object or objects you have selected.
Edit Type.
Select an object and Edit Type.
You usually want to Duplicate so you only affect the object you have selected.
In this instance I don't want every door in the entire project to be 36 inches, just this
one I selected right now.
Filter Selection.
This is a great way to select objects if your drawing is starting to get crowded.
Select everything, hit FF and use the dialogue to select just what you want.
Grid Lines, GR.
They'll automatically number sequentially, so make sure you start with the number you
want.
This is a good use of the array tool.
1, 2, 3, 4, 5.
If you want to go the opposite direction with A, B, C let's start with A. We'll change it
here first, that way it will make the next one B.
HC, temporary hide a category.
HH, temporary hide an element, HI, temporary isolate an element, and HR will reset all
of those.
HT, halftone an element.
HY, halftone a category.
That's the same as going to Visibility Graphics, and coming down and checking the halftone
button.
KS opens up your keyboard shortcuts.
You can export yours, you can change them or you can import custom ones.
I've been using a lot of custom shortcuts in this video, visit the link in the description
to download them for free.
LF, load family.
M comma, open up your material settings.
Match Type, MA.
This is an easy way to change the type of an object to one that's nearby.
Move command.
Select your object MV, point in the direction you want to go and type in a value.
This is almost always better than using the arrow keys.
Paint, PT.
This is a great way to change the appearance of an object, but it doesn't change the actual
properties.
So it will change the appearance of this wall in all views, except if this is modeled as
a brick wall it will remain a brick wall in plan, section and in schedules.
QW to edit linework.
Come up here and check what style you want the line to be, and then just select the line.
For walls you usually have to do twice, once for each side of the wall.
Scale, RE.
Select your object and start the command.
Select the base point, select the reference point, and drag in the direction you want
to go, I want to scale it larger, and then just type in the value.
This is not the most accurate way to make a measurement but if this was an underlay
for as-built drawings, that's definitely good enough to get you started.
Filled region, RF.
This is a great drafting and annotation tool.
Select your line style up here, select what pattern you want up here, and draw your filled
region.
To create rooms, start your room command, RM, and then just click in areas that are
bounded by walls.
If you want to create a room in an area that's not bound by walls, use your Room Separator
tool and draw a line between two walls.
If you want to create a room that spans across a wall, select that wall and uncheck Room
Bounding.
Rotate, RO.
Select your object and start the command.
Come down and drag the basepoint to where you want to start your rotation.
Select your reference line and drag in the direction.
It's always best to type in an actual value.
Room Tag, RT.
In case they didn't tag on placement.
Select All, SA.
Selects all visible instances of an object in that view.
SE, create a section.
Use these arrows to flip which way it's facing.
Double click on the arrow part and you can go to the view.
Split face, SF.
Start the command and then hover over the face of the wall you want to effect.
Draw a line anywhere that connects these two boundaries of the wall and hit ok.
Now you have two faces of your wall that you can paint separately.
Split Line, SL.
Unlike split face, this is actually changing your model.
Sync to Central, SS.
This is only valid if you're working in a worksets enabled model.
I always do, even if I'm the only person in that project.
Always make sure user created worksets is checked so you don't lock anyone else out
of the model.
Tag Objects, TG.
Uncheck Leader and just start clicking on the objects.
You can always go to annotate, Tag All.
Thin Lines, TL.
This is the view of how it will plot, a lot of times it's easier to work with thin lines.
Trim.
Add text notes, TX, they come with built in leaders.
VV or VG to get to visibility graphics.
This will change the visual appearance of everything in this view.
WA, create a wall.
WN, create a window.
Windows must be hosted by walls.
You can't create a window over here.
Wall Reveal, WR.
Make sure you set it to horizontal or vertical, depending on what you want.
You have to reset the command to change the orientation.
If you select the reveal you can come to Edit Type and see how that profile is being generated.
Wall Sweep is similar, this is great for trim.
Control Left Arrow can re-select the last selection.
If you had this selected, you clicked off and you want it again, control left arrow.
This is also good if you're going into a 3d view and you lost your selection.
Select it again and there it is.
Paste Aligned to Current View.
This is good if you want to see what the vertical relationship is between areas, or paste objects
directly above or below where they are.
On the second floor, Control C. On the first floor the shortcut is Control Shift V. That's
where that closet it, and now those windows are in alignment.
And that's it, 50 Revit basics in 7 and a half minutes.
Things you can do today to get started and to become more proficient in Revit.
I used a lot of custom shortcuts in this video.
You can download them for free, along with a one-page handout at HyperfineArchitecture.com.
Check out the Resources page.
If you have a suggestion for a future tutorial leave a comment and thank you for watching.
-------------------------------------------
Death Rates are Rising for Some NC Residents - Duration: 2:02.
Death rates are increasing for midlife whites in North Carolina, this according to a new
study out of ECU's Department of Public Health.
That's not what we wanted to see, but remarkably we saw a substantial improvement for nonwhites.
And that's a paradox.
Professor emeritus Dr. Chris Mansfield and his colleagues, Satomi Imai and Katherine
Jones authored the study that looks at North Carolina data from the years 2000 to 2013.
They say the racial disparity between nonwhites and whites is lessening – which is a good thing.
The data shows that the death rate of nonwhites, aged 45 to 54, decreased 30-percent.
However, for whites, the death rate increased by 6-percent across the state and by 17-percent
in the poorest counties, which they say, indicates economics as an important factor.
The main causes of the increase in death for midlife whites are suicide and liver diseases.
Some people have described these diseases of despair.
Perhaps the burden of the Great Recession.
Dr. Mansfield cited a study that shows continual decline of death rates in Europe and Canada.
He notes that the big difference between the countries in these studies is universal healthcare.
We need to do something about it.
It ought to be improving for everybody.
He suggests things like strengthening the Affordable Care Act, expanding Medicaid in
North Carolina and improving behavioral health services could help decrease these death rates.
But there could be more to it.
One has to wonder if there's a factor involved here in terms of hope – that people have
a more positive attitude about their life chances.
For Dr. Mansfield, one thing is for sure, our health care system and society should
be working better for everyone.
Giving everybody a chance to enjoy long healthy lives.
-------------------------------------------
5 Skills That Your Child Needs For The Jobs Of The Future - Duration: 4:57.
Did you know that you could combine six standard Lego bricks in more than nine
hundred fifteen million ways? Neither did we but 98 percent of children and
kindergarten are creative geniuses who can think of endless opportunities. This
ability is drastically reduced as children go through the formal schooling
system and by age 25 only 3% remain creative geniuses. So, today in this video
of my how book, we are listing five skills that your child needs to remain a
creative genius for the jobs of the future.
Number 1: complex problem-solving skills. Problem-solving skills are a must
for proper functioning on a daily basis at home or at work. This is an important
skill for a child to develop in order to achieve a bright future. If a child is
able to solve problems on their own, he or she is more likely to be happier
confident and more independent in the future.
Therefore we should begin teaching children problem-solving skills from an
early age. Instead of running to the rescue give your child a chance to
attempt a resolution on their own and watch how they observe and examine the
problem.
Number 2: Critical Thinking Ellen Galinsky author of mind in the making
has listed critical thinking as one of the seven most essential life skills
needed by every child. In today's world of social media and Internet, children
need to be able to do much more than just repeat a list of facts they need to
be critical thinkers, who are able to make sense of the information, analyze,
compare, contrast, make inferences and generate higher-order thinking skills.
Provide them with opportunities to play ask them open-ended questions and
encourage them to think in new and different ways.
Number 3: Creativity people assume that creativity is an inborn talent that
their children, either do or do not possess, but actually creativity is more
a core skill than inborn talent and it is a skill that parents can help develop.
Scientific research indicates that exposing them to music and art is not
enough, but encouraging a creative approach to the problem by solving and
communicating can help with their everyday activities.
Number 4: Judgment and Decision-Making
There are many variations of this playground rhyme but whatever variation
it has, it is a simple decision making tool. Children all around the world use
this or similar rhyme to decide who their opponent or teammate will be or
which chocolate they will eat.
The natural ability to learn through play maybe the best kept secret for
addressing the skills agenda to help both our children and economies thrive.
Number 5: Cognitive Flexibility Imagine you are driving somewhere and
discover that a street you were planning to turn onto is blocked off for
construction, your initial plan for reaching your destination obviously
isn't going to work. So, you instantly come up with a new way
to get there. Help your children grow their cognitive flexibility through
games like, the Fanny Doolee and What's This?
You can also teach them self-talk skills which will become more important in
their adolescent and adult life.
Thank you for watching the video. Please, like, share, and subscribe for more videos
Like this.
-------------------------------------------
Château Nottebohm and the link with 'Miss peregrine's home for peculiar children' - Duration: 16:46.
This episode is about 2 castles that are important in our film history,
more specifically the film: 'Miss Peregrine's home for peculiar children' from the American director 'Tim Burton'.
He came to record this film in Flanders and his first intention was to use 'Château Nottebohm' as a castle.
But the Nottebohm family kindly thanked for the offer
'Tim' has only moved to a castle a few kilometers from his first plan,
namely castle 'Torenhof' in Brasschaat. However, this last castle is not (yet) an urbex.
First some information from Tim Burton himself
Good morning, dear viewers.
We are going to work around the film today; 'Miss Peregrine home for peculiar children'
The first important location that we will visit is 'Château Nottebohm'
'Château Nottebohm' was the first location to be used in the 'Tim Burton' film
But then later moved to another location,
because the owners of 'Château Nottebohm' did not even want a film crew in the garden.
Those people are, I think,
I hope they do not look, but% #! @ & will we say.
That house is languishing in the middle of the forest
But it is under camera surveillance
signs everywhere of the hunt.
they do not tolerate pot viewers there.
they indeed do not tolerate prying eyes.
Then why do we go there?
Because we probably love the adventure a bit.
And because today it is apparently very difficult to take another picture from the outside.
But first we will try to get this movie on film,
after that we will go to the castle where the film is actually shot.
I will also try to mount a few pieces of the film in between,
so you can see which house it is about.
And let us now hope that we get to see 'Château Nottebohm'.
There through that gate!
Lots of people!
A lot of people,
and they've all seen us for a long time.
Here in between, below.
It is hoped that no agent is present.
This is 'Villa Prairie' and is right next to 'Château Nottebohm', but we are here now and go and have a look inside.
Currently this location is on the map as a 1-star location.
And that is understandable!
So we will not go around the house.
This is really a painting from a horror movie!
Such a drawing with three shadows,
but what does that fourth do here?
And then that mirror!
Quite a scary mirror!
Here it is beautiful, the owner's wig is still here.
in 'Seekerz' their movie you saw how they thought someone was standing in front of the window.
That's right!
And that was this!
Here are a lot of washing machines, that was here a fancy dress shop or something.
I do not trust the floor here!
Indeed, that floor, neither do I!
I do not know what they meant by this.
Fortunately, we know what time it is, because it is orange over lemon.
There is currently a mountain bike race here.
Watch out, because here is barbed wire!
On google maps it looked like there was a passable road between those trees.
This here?
Yes!
Follow in a straight line and we arrive at 'Château Nottebohm'.
Camera men!
Behind that bush....
Behind that bush is a camera.
Can you see him?
There on that pole!
You can not go inside!
No, when there were no bars at me, that was not yet!
We go around and we are back!
OK, along there, or along there? choose!
There is also a camera, so it does not matter.
Come on, go on, choose a side.
Where is the front? That's the front?
We will go around soon.
As you can see, this house becomes
completely monitored with cameras.
And so we are going to leave now, because I think we have already warned someone.
It is full of cameras here, even in the forest!
This was a quick glimpse of 'Château Nottebohm'
We will soon try to make a few photos or a movie
at the castle, where in the end the film was really made.
But according to us, that is still inhabited, if I am not mistaken.
It is certainly much more heavily guarded than here, and it was already bad here.
so it might just be a zoomed-in photo from the fence.
I would say, watch that movie, that's a good movie!
And then we see you at the next location.
Kasteel Torenhof
We are now a little later.
It is now Tuesday evening.
We have tried to enter Castle 'Torenhof', but that is still inhabited.
That man told us that they really could not appreciate that everyone just walked in here.
I'm going to try to zoom in a bit.
I will also jump over the brook.
-------------------------------------------
ConvertKit Plug-In for Wordpress: Quick Start - Duration: 9:44. For more infomation >> ConvertKit Plug-In for Wordpress: Quick Start - Duration: 9:44.
 -------------------------------------------
Morning Sprint for January 31st - Duration: 4:59. For more infomation >> Morning Sprint for January 31st - Duration: 4:59.
 -------------------------------------------
Line Messaging App Begins Financial Services For Users - Duration: 2:31.
Line Messaging App Begins Financial Services For Users
Japans biggest messaging app Line said Wednesday it was launching a financial services spinoff to allow users to exchange and trade virtual currencies.
Line said its new business would provide a variety of financial services, including a place to exchange and transact virtual currencies, loans, and insurance. The transactions will be made inside the messaging app, which already incorporates a mobile payment system.Line has a relatively small presence in the US and Europe, but is hugely popular in Japan and several other countries in Asia, where cryptocurrencies like bitcoin are heavily traded.
Line said it had already begun the process of registering its new virtual currency business with Japans Financial Services Agency, which regulates cryptocurrency exchanges in the country. Its shares rose on the announcement, closing up 2.
The announcement follows a massive $530 million heist of cryptocurrency last week from Japanese virtual currency exchange Coincheck. The loss exceeds even the $480 million stolen in 2014 from another Japanese virtual currency exchange, MtGox.
Japans government has slapped Coincheck with an administrative order, and governments around the region and further afield have begun tightening regulations on virtual currency trade.
But cryptocurrencies have remained stubbornly attractive to investors, particularly in Japan where ultra-low interest rates have left few good options for returns on cash.Line was launched in 2011 after Japans quake-tsunami tragedy damaged telecoms infrastructure.
It combines features from Facebook, Skype and WhatsApp with games and a mobile payment service.
-------------------------------------------
Manchester scaffolder faces jail for breaching safety law | news 24h - Duration: 4:24.
Scaffolder faces jail after he was snapped working 60 feet up the side of a building wearing a harness that wasn't hooked to anything
Pictured: Terrance Murray, 27, leaving Manchester Magistrates Court yesterday . A scaffolder could be jailed after he was photographed working at 60 feet wearing a harness that wasnt secured to anything.
Terrance Murray, 27, was erecting scaffolding at the side of a six storey building when he was unknowingly snapped by a retired health and safety inspector.
Now the daredevil is facing up to six months in prison after he admitted breaching the Health and Safety at Work Act.
His stunt happened as he was constructing scaffolding at the rear of the Grade II-listed Sunlight House in Manchester, on June 30 last year as part of work to renovate the windows.
The photo shows him looking directly into the offices of the Crown Prosecution Service, which occupies some of the building. His apprentice can be seen working further down the scaffolding.
Murray, an experienced scaffolder, can be seen standing on planks without having first erected a rail to stop him toppling over the side, as required. In the photograph, he is wearing a harness but it isnt connected to the scaffolding.
Dangerous: Murray, pictured top, was unknowingly photographed by a retired health and safety inspector when he was working on scaffolding without wearing a secured harness .
When he appeared at Manchester and Salford Magistrates Court yesterday, he admitted a single breach of health and safety law under his full name Terrance Tyson Murray.
Murray, of Blackburn, pleaded guilty to failing to take reasonable care for either himself or others who may have been affected by his acts and omissions while at work. In court: Murray admitted breaching the Health and Safety at Work Act.
District Judge Mark Hadfield adjourned the case when Murray, who was not represented by a lawyer, admitted he hadnt realised he could be sent to prison for the offence.
When Judge Hadfield suggested he get himself a lawyer, Murray said: What if I cant afford it?. The judge replied: Thats a matter for you. If I were you, Id get legal representation..
The case was adjourned until February 20 to allow Murray to consider getting a lawyer.
After the hearing, HM inspector of health and safety Matt Greenly said: The potential for his actions was the death of a young man. This is a situation which could easily have been avoided. He had all the right equipment.
He chose for some unknown reason to take his life in his own hands that day.
Không có nhận xét nào:
Đăng nhận xét