Chủ Nhật, 12 tháng 2, 2017

Waching daily Feb 13 2017

Oh, come on.

Hi!

DESI: Bella, join us.

-Tonight? I have plans. -Oh.

And it's totally not your crowd.

You think I have time to go Poughkeepsie,

to support her like, sick, little tryst.

Yeah, 'cause nothin' says,

"Let's get this romance back on track" like Poughkeepsie.

Okay, I'm kinda freaking out.

This is it?

New York's best and brightest we-men?

Whole lot of pleather, considering.

-Where's my name tag? -Ugh! No.

For more infomation >> Girls 6x02 Promo "Hostage Situation" (HD) - Duration: 0:31.

-------------------------------------------

How To Crack Internet Download Manger (IDM) For Life Time 2017 - Just 5 Minute [Hindi] - Duration: 6:18.

For more infomation >> How To Crack Internet Download Manger (IDM) For Life Time 2017 - Just 5 Minute [Hindi] - Duration: 6:18.

-------------------------------------------

Kevin tries For Honor - Duration: 1:03.

I'm blocking you now,

now you're dead

and its like

Why would you do this to me? :(

I lunged at you first,

You're at one health

And then you're like deciding to have a comeback

and decide to be better than me???

NO ONES BETTER THAN ME

A L R I G H T ???

SO JUST STOP.

J U S T S T O P B R E A T H I N

Just Stop Breathing

NO

J-Jus

*pain*

*leaves voice channel*

*death inducing laughter*

-STAB YOU

BUT NO YOU LIKE

*ear rape*

IT'S LIKE TEN FEET LONGER THAN MINE ( ͡° ͜ʖ ͡°)

AND YOU JUST START

TO LIKE

MOVE IT SLOWLY IN MY DIRECTION

AND IT SOMEHOW HITS ME >:(

EVEN THOUGH I BLOCK IT >:(((

BECAUSE I'M BLOCKING RIGHT,

AND IT'S LIKE "NO MY SWORD'S BIGGER THAN YOURS >:)"

*child's gibberish*

AND IT'S LIKE

N O

THAT SHOULD'VE WORKED

I SHOULD'VE DODGED THAT >:(

I'M BETTER THAN YOU >:(

JUSTSTOP

STOP

AND THEN

LIKE

IT'SJUSTNOTFAIR >:(

I have two- I HAVE TWO SWORDS,

Y-Y-You have one

It's like 2 v 1

???

FIGHT ME >:(

"Kevin, calm down it's just a game" :)

NO

IT'S NOT A GAME

ALRIGHT so

So then there's like the weeaboo ones with their sticks and stuff,

THISONESEVENWORSE!!!!!!!!!!!!!!

This one even worse DX

CAUSE THEY ALL HAVE A NINJA SWORD

AND YOUR NIGGA (?) SPEARS

AND THEN THEY'RE MEGA WEEABOOS

AND THEN THEY'RE MEGA TRYHARDS >:(

*breathes*

Aaaaaah :(

For more infomation >> Kevin tries For Honor - Duration: 1:03.

-------------------------------------------

Best cornrows for sew in lace closure. / les nattes qu'il faut, pour mieux placer la lace closure. - Duration: 5:29.

For more infomation >> Best cornrows for sew in lace closure. / les nattes qu'il faut, pour mieux placer la lace closure. - Duration: 5:29.

-------------------------------------------

ThoughtWorks Data Visualisation: Good for Business - Duration: 38:03.

>> Welcome to the HIVE.

My name is Andrew Woods.

I'm the manager of this new facility.

The HIVE stands for the Hub for Immersive Visualisation and eResearch

and it's a new facility in the university intended to support and encourage visualisation

and virtualization, simulation aspects related to all things visual.

The primary aim is to encourage research outputs in this field and it's seen as a field

of great opportunity and great potential for enabling us to do things a lot better.

So as I mentioned it's a new facility.

We launched on the 27th of November and we're still in the process

of commissioning so there's still a lot to do.

I might just provide you with a quick rundown of the four displays we have here.

These are sort of the most obvious part of the HIVE the four visualisation systems.

Each of them have their own characteristics and allow visualisation

to be done in a range of different ways.

The first of the displays is what is known as the Tiled Display.

It's a media wall.

It's another way of describing it.

It's a ten square metre area of LCD panels bigger than some people's swimming pools

and over that area we have 24 million pixels.

The wall is made up of 12 full-HD LCD panels, media grey panels with a very small border

around the sides so they can be shown together very closely.

There's a whole manner of different types of content that can be shown on here.

We don't have enough time to go through all of those different options right at this moment.

The next display on your right is called the Cylinder.

It's a three metre high screen, eight metre diameter curved screen when you're standing

in the central point it fills 180 degree of your field of view.

This can run in stereoscopic 3D using the provided 3D glasses over there.

The screens are filled with three projectors which are mounted from the ceiling there

and this can be used for a range of different topics and tasks including virtual environments

which we've got here which we've got here illustrating a project

on the HMAS Sydney which we're working on.

The screen behind you is called the Wedge.

It's two rear projected screens mounted at 90 degrees to each other.

Those screens can be angled outwards to form a flat screen as well, 2.8 metre diagonal,

full-HD resolution on each display and can also be run in stereoscopic 3D so we're anticipating

that screen there would be used for visualisation of volumetric data

or business data for example or viewing of stereoscopic content.

There's a demo loop there.

There's a set of a whole heap of glasses sitting on the small podium there so please,

once this session's finished please come through and have a look at that screen as well.

Each of the screens the glasses only work

on that particular screen so these two are stereoscopic.

These two aren't.

The screen on your left here is known as the Dome or it's actually a half Dome,

4 metre diameter and when you stand at the apex of the screen it fills your full peripheral

and primary vision so when you come in here don't stand too close.

We don't want you walking off the screen for example.

The purpose of today's session is to talk

about data visualisation primarily looking at business data sets.

We've invited ThoughtWorks on the campus to present this topic.

I want to be clear that we're not endorsing their work.

They're just providing an illustration of what is possible.

They have some very good illustrations of visualisation and what it is capable of.

They also have done some range of work with some groups on campus as well.

So I will now hand over to David and also give you my microphone.

>> Thank you Andrew and first baton pass of the afternoon.

So as Andrew said we're here today to talk about some organisations we've worked with

and the benefits that they've realised through data visualisation and we'll also talk a bit

about the approach that we've tended to use there which is quite a lightweight

and rapid approach to reaching a visualisation.

So before we go any further I'll just make sure I introduce the two of us properly.

I'm David Colls and my colleague--

>> Ray Grasso.

>> And ThoughtWorks is a software product development consultancy so we're based here

in Perth but ThoughtWorks is a global group.

So I guess the key thing is visualisation is used for a purpose and what sort

of problems do people solve with visualisation?

Well one of the earliest examples takes us back to Victorian London and the middle

of the cholera outbreak and some of you might be familiar with this.

In the 1850s over 600 people died in the cholera outbreak and John Snow was seeking

to understand why and to do that he drew a picture from the data.

He collected data about where the deaths had occurred and for each house

or each location along the street where there was a death he drew a black line to indicate

where people had been dying and as he put this picture together it quickly became clear

that there was a problem near the Broad Street water pump

and using this visualisation he was able to convince the authorities to remove the handle

of that water pump and was able to convince them

that that was the source of the cholera infection.

And this was before there was even a mechanism that could be understood

for transmitting cholera from a water pump.

It would be another seven years before Louis Pasteur introduced the theory of germs

and then the prevailing wisdom of the time was spread by miasma or bad air.

So this was a pretty good outcome for a drawing based on some numbers

and he was subsequently able to convince the authorities that dumping raw sewage

into the public water supply was a bad idea, a great legacy of public hygiene

from that particular data visualisation.

But if we come back to the present day then we see that all sorts

of organisations are using visualisation for all sorts of purposes, corporations, governments,

NGOs, formal and informal alliances of all of those then individuals participating

in hackathons and similar activities trying to combine data sets and produce meaning

from them especially where they are complex and difficult to understand.

And why are people trying to visualise this data?

Well, it's because it has a number of advantages for us as human beings.

Visualised data is easy to understand because it engages our innate cognitive mechanisms.

It's also the case that once you've understood a data visualisation you can use it

to pursue further investigation, so once you know what it's showing you can use it

to interrogate whether it's showing you what you expect.

It's a shared view.

So with a visualisation that's shared among a group the entire group can focus its energies

on making that picture better rather than disagreeing

on what the picture should look like.

It's a holistic summary you might say that nothing gives you the big picture

like the AV picture and it also provides new insight so you might set

out to create a visualisation that will show you certain things

but you can be pretty much guaranteed that you'll see new things in the process

of producing that visualisation and for those reasons,

for the reasons of visualisation it's good for people.

It's good for business because business runs on people.

But in particular we've seen with our clients that they're looking at two major outcomes

from data visualisation and one of those is to increase engagement

to produce compelling communications or build brand awareness with an audience

that might be external or it might be internal or it might be a combination of both.

And their also using visualisation to try and gain insight into their operations

to have a very lightweight approach to drilling into complex data and seeing what leaps

out as opportunities for improvement.

But to talk about engagements we'll hand the baton over to Ray.

>> So as Dave mentioned kind of one of the themes I guess that we've found with some

of our clients reasons they're using data visualisation is around increasing engagement.

In the first case we'll look at is increasing engagement by telling a story over a complex set

of data what is inherently a complex story trying to tell that in a really simple fashion

and so the client we're speaking about are the Independent Market Operator or the IMO

and for those who don't know who they are, the IMO, one of their responsibilities is to operate

and develop the wholesale electricity market of Western Australia so big producers

of energy and big purchases of energy.

They operate in these various markets trading sums of energy

and the IMO job is to facilitate that.

When we first spent time with the IMO sort of discussing the data in their world,

I mean they send in a lot of different data across these different markets

and they have a lot of different stakeholders both in the government and in the public

and within the industry itself and the kind of approach they had taken up to

that point presenting this data was kind of this style of presentation.

This is something we pulled straight from their website when we first got there.

It's sort of a static graph showing a bunch of figures and forecast lines and things like that

for the people sort of within the market there's probably a certain level engagement

with the raw numbers but for a lot of the average people they sort of see this

and eyes kind of glaze over and they sort of move on.

So I'd just like to cover the approach that we went through with the IMO

and one of the specific pieces of the project that we that we did with them

in taking this data and trying to get the engagement up and increasing it

with their audience and this is sort of the broad sweeps of the process and it was sort

of a broad question that started the whole project really then there was a data discovery

portion where you really dig into the numbers to actually see if it backs up the proposition

and then really rapidly refining a solution to communicate a visualisation over this data.

And the broad question that started the overall project really was just a hunch

and it was actually a conversation with the CEO of the IMO

and he basically effectively said some of the big players

in the market are doing some weird things with their trades.

It's unusual.

See if we can tell that story and show that story to people so you kind of take a step back

from that and go, well that's pretty broad like what does that mean?

And so the first reaction and the first step that we would generally recommend is to sort

of dig into the data to try and see what this story is if this is actually a story.

So that's what we did.

We grabbed a lot of the information straight from their core systems,

threw it out into really simple files like CSV files

that we could look at in Excel and stuff like that.

This is sort of where we started so we kind of graphed out all the different participants.

Each of these coloured lines are a different generator or retailer.

The top there it shows their total volume of trading in this particular market

and this one here shows who sold energy into the market and the bottom one shows

who bought energy from the market.

So you look at that and it's still really noisy and really doesn't say much

so the exploration kind of continues and so these are sort

of snapshots along the process that we took.

So here you can sort of see now we've broken it out for an individual participant

so there's two participants there so that the green bit

above is how much energy they're selling into the market.

The red below the line is how much they're buying.

These are quantities and this is sort of over time since the inception of the market.

So you start to get a bit more of a sense of who's doing what.

It's a bit easier to sort of dissect but the story still wasn't quite there so we sort

of split that graph out even further.

So now we've got it broken down by the hour so you can sort of see each trading interval

as sort of roughly an hour and the volumes that they're trading at that time

and the top there is the largest generator so particularly you would expect the largest seller

into the market and here is the largest retailer so effectively here we expect

to buy the most energy out of the market.

And there's something interesting about this.

Now it won't be immediately interesting to you guys generally but you can sort of see here

from about midway through 2012 the largest generator of power started buying lots and lots

of power and the largest retailer of power started selling lots and lots of power

and they we're doing it overnight.

So basically from 10 o'clock in the evening until 7 in the morning and if you look

at these two they effectively reflect each other so this sort

of high level visualisation you can get a sense of what was going on

and so at this point we knew that okay there is some interesting trading behaviour here

that would be useful to actually illustrate.

We kind of worked out that there is a narrative behind this and so at that point is

where we really switched gears into that final sort of solution part of the process.

Here it's really about shifting into the communication of realm rather than the data sort

of digging around, so you have a story so how do you effectively communicate that story?

So you start with paper, lots of brainstorming and sketching and ideas

like how can we show these different players and the volumes

that they're contributing or taking from the market?

Once we sort of had a general direction we wanted to go

in then we really went into sort of solution realm.

So the channel here that we're working with was the Web so via the public website

so we were working in HTML, Java script, CSS, typical web technologies and our part was just

to really with the IMO was to build a solution and integrate it as we go rather than kind

of Photoshop it up and imagine it as an idea and then come to implementation work

out that it wouldn't actually be implementable.

In fact that's the approach we took and this is a sort of snapshot of different milestones

or points along the evolution so we kind of had this sense of the market in the centre

and the different participants sort of around the edges and the different volumes of energy

that they were contributing or taking from the market as sort of flowing out from there.

And so as we started to evolve that that kind of resonated with a lot

of the folks we were talking to but we realised that we needed to kind

of anchor it in time a little bit more.

Just having a single snapshot was difficult for people to know where they were

so we added this timeline type presentation on the left which you sort of saw from before.

So here you can sort of get a high level snapshot view over time and you can sort of drag

in and see the individual trading volumes and so what we finally end up with come

over to the right side over here was this presentation piece in the middle,

so here we have this kind of selector or this little window, this monthly window

over the duration of the market and on the right you can see that the market in the middle

and the different volumes from the different participants around the edge, so for instance,

in September, you can see the largest generator there

at the top buying a really large amount of energy out of the market.

And the largest retailer there, that was almost magical, wasn't it-- selling it.

Let's see if I can scroll this up a bit.

There we go.

So there's a lot going on.

There's a lot of the information within this single visualisation and it's a theme

that you'll see again when we get into the portion that Dave was speaking about.

Once you get sort of, once you can navigate this, once you understand the layout

of what you're seeing you can actually assume a lot of data really quickly and you can sort

of interact with it and explore it in a way that just a table of figures

and a static graph just doesn't allow you to do.

And so if we come back that was again an example where one

of their clients were using data visualisation to try to get this information

out to their different stakeholders, getting more engagement with people.

Second case is really around amplifying engagement so again,

this whole idea of using data visualisation to get people closer

to the data and to the organisation.

And this client is basically the folks from the Desert Fireball Network,

the fireballs in the sky if you haven't heard of them based here in Curtin.

Phil is right there from the DFN.

Hi Phil. [Inaudible] So for those of you who don't know what the DFN is about

and Phil don't throw stuff at me if I butcher this.

Meteors are flying through the sky and they sometimes explode into fireballs

and the Desert Fireball Network is basically a network

of cameras throughout the Australian Outback poised

on the sky taking long exposure photographs continuously and then Phil

and his team afterwards take those photographs and use the fireballs in them and the positions

of the cameras to basically get the trajectory of these fireballs to work

out if they maybe hit the ground and maybe where they've come from and that can lead

to expeditions where you're actually trying to recover the meteorites or calculating

where they come from and the reason geologists will do this is because this kind

of information can help make us understand more about the origins of the universe.

It's pretty grand stuff.

It's pretty inspirational.

You can see-- is that running with the live one?

But there was different shots there so it's like a time lapse of some of the camera images

in this spherical screen over there, so it's really interesting stuff.

So when we first sat down with the Fireballs team it was really to talk about a brief

for a Smartphone app so really grand ideas and now we're talking about a Smartphone app.

The Smartphone app the main idea of it was really about bringing the general public sort

of closer to the science and sort of an outreach engagement awareness piece

and there's a really interesting piece to this where it was

about actually engaging citizens in the science itself.

So one of the core features of the application you can see as described here

and it really was this case where someone's out say, somewhere in Perth,

and in the night sky they see a fireball.

They pull out their phone with the app.

They tap where it started.

They tap where it ended.

They record a bit of information about it and that information goes off to the DFN folks

and you get enough of these folks seeing the same fireball it could help actually contribute

data to basically complement what was already in the DFN.

So this core sort of flow is sort of pretty simple and you can sort

of see there fireballs are a pretty spectacular thing but the information

that describes it is actually fairly mundane.

I mean you've got elevation.

You have azimuth.

You have with the duration in seconds, really a lot of numbers effectively

and so as we were sort of exploring this when we were working it

out if someone actually sees this how are they going to describe it?

Are they going to be saying oh yeah, it's like a minus four magnitude of brightness?

It was to 12 degree elevation here and it was about 5.2 seconds long.

Like that just wasn't realistic.

What you're more likely to get is someone that will say something like that.

Like it broke up and it was kind of green and it went in this direction and so that core idea

of can we put something together where people are interacting with this information?

This is really about authoring information.

Authoring data kind of coalesced in this first version

where you would basically build your own fireball.

So this would be part of the capturing so once you've tracked where it was you would come

in there and you would set the colour of it.

You would set the shape and how many pieces and all this kind of good stuff

and this animation would update, does update.

I'll go to my phone, I'll show you afterwards, in place and you can see that

and it was a much more engaging way to get people

to actually give you the information rather than going through a long boring form.

So after that first milestone, that first release we kind

of asked the question can we go better in other part of the application?

In two other parts of the application that we looked at was really

that capture piece and the sightings or viewings.

So the capture piece as you can see is really just a big button so it was

like it started there and it ended there.

It was quite static and the sighting piece

like showing a sighting was really just showing the textural information.

It was just like a static map of where they saw it.

So we did do better with the great help of the folks at the DFN and fireballs in the sky

and so the capture process became this sort of live, heads up display

and then an actual star map behind it, so you can see there these dots here are a star map

and based on where the person is sitting and the orientation of the device it would overlay

in this sort of augmented reality way the stars that they should be seeing behind there.

It became a much more immersive experience.

It's something that was actually just a stand-alone part of the app.

I'll sort of wave it in front of you right now so folks if you can see that you can sort

of see it's sort of live updating.

You can sort of see the horizon.

There's all the stars there and you've got the heads up display and as you sort of go

to capture it draws out the path like that and then you get into your building of the fireball.

So it's a much more immersive experience than just tapping those two dots.

And then on the sighting screen itself you know rather

than just showing the aesthetic attributes on the right there's also this animated fireball

over the star map as it would have been captured, so again, here you've sort of both

on the consumption side and almost the production side you're really trying

to up the engagement and get people to engage with the app

in a way that they otherwise might not.

So that's the two examples sort of within the whole sort of business goal

of organisational goal of increasing engagement.

I'll hand it back over to Dave to talk about operational insight.

>> Thanks Ray.

So I guess the next main case that we'll be looking at is gaining operational insight

and I guess here you might summarise that as trying to pick out something that sticks

out like a sore thumb as a starting point.

And something that stuck out like a sore thumb to John Snow was the fact that nobody died

in the brewery which was just down the street from the water pump but that was

because all the monks in there spent all day drinking beer.

How times have changed.

This case is about when you need a big picture view to kind of spot what doesn't look right.

And for this case we go to a call centre and a call centre

where there's a big improvement programme and the performance of the call centre is measured

in terms of customer satisfaction which is assessed by NPS or net provider score

and by how much it costs to run the call centre or operational expense.

So those are the two key measures of the performance of the call centre

from the organisation's perspective.

The improvement programme is looking to achieve a balanced improvement in both of those.

But it's a big call centre.

It's really big.

It's 200 thousand calls a day.

They're dealt with by 10,000 agents who are across multiple countries and time zones

and there are 500 or more products.

No one is really sure how many products are actually supported by the call centre.

It's a bit like that.

It operates 24-hours a day and seven days a week and this presents the challenge.

We're trying to improve this enormous call centre

but we have trouble picturing what it looks like now because it's so big and so diverse

that we can't really get a good handle on how to start the improvement process

or even what looks particularly wrong about it that needs to be improved.

We have some metrics around Q sizes and around wait times and we have some levers

that we can pull and push but it's not really going to--

that sort of small scale fiddling isn't going to really achieve the objectives of this programme.

So in this case we set out to draw a picture of the call centre and much like Ray showed

with the evolution of the short-term energy market this was an evolving process

and it's quite fascinating looking into that.

But we're going to skip right to the end product in this case and this is the end product.

This is the picture we drew of a call centre.

It might not immediately strike you as a call centre but maybe when I talk you

through it you might see the reasoning behind it.

This is actually a point in time in the call centre, so this is about ten o'clock

in the morning and it shows all of the calls that are active in the call centre at this time.

So there are about 3,000 calls active in the call centre and each one of those is represented

by a character on the screen, one of the catatonic characters.

The calls can be in basically one of two states.

They can be in a queue, so you've just called up.

You've entered a few things with your voice or with the phone keypad

and now you're listening to hold music.

In that case then you're in queue and that would mean you're

in the orange section at the top of the screen.

The longer you stay in the queue the further down that orange section your call progresses.

When the call is answered and it's a customer talking to an agent and it's

in the green section lower down the screen

and again the longer the call has progressed the further down the screen the call moves.

Different types of calls or inquiries by customers showing from left to right

across the screen so that the horizontal position determines the nature of the call.

So on top of this there are some things that we can also show that we know both upset customers

and lead to increased operational expense.

The thing that upsets customers is and they hang up,

the one thing that upsets customers is hanging up in the queue so we're showing calls that hang

up in the queue with an exploding bubble.

So those are where customers have hung up and another thing

that upsets customers is being transferred from one agent to another because typically you have

to go back into the queue again and that's shown with diagonal lines that go from a conversation

with an agent back up to a queue for a different call type.

So that's a picture of just a slice of time in the middle of the morning at the call centre.

But that's not even the biggest picture I guess, that's still a small picture.

What we can do is actually come over here to the cylindrical display

and we can watch the whole day in the call centre unfold.

So we go back in time a little bit to start at about 7 o'clock in the morning now

in the call centre and we're running a lot faster than realtime

so we're running 128 times real speed and we could see all of the things that we saw

in the static image over there but I'll just talk you through them again where it's live.

So when we set out to draw this picture

of the call centre these are the things we expected to see.

We expected to see calls arriving.

In this case these are bill inquiries arriving in the queue for bill enquiry calls.

We expected to see them progressing through that queue and as you can see they're moving

down the screen there as they progress and we can also see the abandons

where customers are hanging up in the queue up there.

When an agent is available then the call is transferred through to that agent

and we can see calls being answered by agents in the lower part of the screen.

Again these are all billing enquiry calls as they progress through their lifecycle

and again we're moving through the lifecycle of that call progressing down the screen.

So we can see billing inquiries there and we can see a different type of call over here.

We can see fault reports coming in over here and right over on the side over here which some

of you might be able to see we can inquiries about fixed line moves

so we can also see transfers in and out of a particular call type.

So here's sales inquiries are presumably going to other areas that relate to the product rather

than a general sales enquiry and other calls are resulting in a sales enquiry of some sort coming

into this queue, so those are the transfers.

Those are the things we expected to see but then there were a bunch of things we didn't set

out expecting to see but we saw once we looked at the visualisation.

And the first of those was that some types of demand that we would have expected

in the call centre just were not existent.

We would have expected people were calling about iPhones but there is zero demand

in that 200,000 set of calls, the iPhones which is quite an unusual finding and it's not one

that we can necessarily answer with this visualisation

but at least we've found an interesting question to ask,

to understand how we can improve operations.

Then to actually answer that question we need to go somewhere else and we need to dig

into the data and we need to use different tools and a different approach

so this is very powerful in identifying what that should be,

the question that needs further investigation.

Another question that might occur that probably doesn't need

so much investigation is why no one's calling about Blackberries.

That one is probably a bit easier to explain.

We also found again over here on this side of the screen that there were calls coming

in for business inquiries but there were no agents there to handle them.

So that's not really a good outcome from a customer experience

or even from a business point of view that all of those customers are just hanging

up in frustration before they get to speak to anyone.

So another thing that we saw was kind of subtle

but once you've seen it then you can't help noticing it and that is

that these queues are supposed to be fairly orderly.

The call that has been in the queue the longest is supposed to be the one that's answered first

but what we can see here is that there are calls that are spending a long time in the queue

but despite that there are new calls being answered by agents before the calls are taken

out of the queue so you can see calls rapidly falling down in green past the orange calls

that are moving very slowly in the queue and that was an interesting finding

because that's not actually how it works in reality.

It turned out that there was an issue with the way the data was being processed,

so there was a large amount of processing going on between the source systems

and actually a single view of this data of the call centre

and in that processing there were errors that were making it look

like calls were jumping the queue when in fact they were not.

So but the rub here is that this same data was being used to make operational decisions

in a magnitude of millions of dollars a year so it's very important to ensure

that it's quality data and a visualisation like this helps us uncover where there are issues

that we might not otherwise find.

And the final one was an interesting finding around transfers so we might expect that

and here customers are calling with a help request.

We might expect that calls are transferred if customers call with two different types

of inquiries in which case it's a legitimate transfer once the first enquiry is completed.

It might be that the automated system that classifies calls gets it wrong sometimes

which it does and in that case an agent should quickly realise and there should be a transfer

from high up the talking area into a different queue type which is the actual call enquiry

but what we didn't expect to see was calls being transferred within the same type.

We didn't expect to see calls being sent to agents who later said actually I can't deal

with this but it has been classified correctly and so this is great opportunity

to improve the performance of the call centre to eliminate unnecessary transfers

and to eliminate unnecessary cost by ensuring the calls only get to agents

that can deal with them properly.

And I could talk about this all day and we will leave it up once we're finished

but I'll hand it back over to Ray for now to bring us on home.

And that means another baton change.

>> Okay, so we'll just wrap up with a few take aways I guess.

There's learnings that we've had in the course of the work we've been able to do

with our clients and a few of those pieces we'd like to just leave you with now.

So we've covered the benefits.

That's probably worth just quickly talking about them again,

so there is data visualisation can be really useful in presenting complex information simply,

sort of efficiency of understanding is another way of thinking about that I guess.

It can be used to make interacting with data something that's almost exciting,

a bit more visceral, so whether it's like the fireballs instance where the capturing

of the data or the actual reading of data, the consuming can be a much more engaging experience

and then for the call centre example using these high level sort of holistic,

fuzzy visualisations of really complex sets of data can help sort of lead you

to ask more questions where you can do more pointed investigations

and take more pointed actions.

So what are the kinds of triggers you might find in your day-to-day work I guess

within whatever organisation that you're a part of that might be a twig for you

to think okay may be this is an instance where data visualisation could be used?

We kind of covered this a little bit but when there is a complex story

to tell there's complex data behind it but you have the data.

The data is there.

If there is not a shared picture certainly

within an operational sense but you have the data.

The data is there again.

You have the data but it's boring to you.

It's boring to look at or it's boring to create.

Maybe there's an opportunity there for using these kind of techniques.

And finally when it comes to execution, so when it comes to building these kinds

of things the approaches that we generally recommend are starting small and both that's

within the scale of which you're trying to achieve and within the teams

that you have and stay really lightweight.

Use real data throughout so there will be a lot of truisms that people will hold and even people

with a lot of experience can be proved wrong when you actually get into the information,

so definitely use real data as early as possible and use it throughout.

And refine and adapt, so none of these visualisations

that we've seen the endpoint wasn't clear from day one.

It was really an evolution and an exploration.

I mean all of the solutions we've seen they're all custom software, custom created

and they all took on the order of weeks to complete.

So with that I guess I'll stand back up and say thank you

and if you have any questions we'd be happy to here them.

[Applause]

[ Silence ]

For more infomation >> ThoughtWorks Data Visualisation: Good for Business - Duration: 38:03.

-------------------------------------------

HTML5 CSS3 Fundamentals:Development for Absolute Beginners 02/21:Creating Your First HTML5 Web Page - Duration: 35:14.

In this lesson I'm going to build an entire HTML5 Web page from

beginning to end. The purpose of this exercise is to familiarize

ourselves with some of the most common HTML5 tags as well as

become familiar with the workflow of formatting an HTML5 document.

Now my focus is going to be giving semantic meaning to the sections

of our document by using HTML5 tags.

I'm not going to worry about the aesthetics or the beauty of

the final result. I'm going to worry about that beginning in

the next lesson, okay. So let's go ahead and get started.

Like I said in the introduction I'm simply going to use Windows

Notepad and then a version of Internet Explorer that can fully

render HTML5

tags and so that means I need to use 9.0 or greater. If you

don't have Internet Explorer 9.0 or greater already installed

please stop the video

and update to the latest version of Internet Explorer, otherwise

you're not going to get the results that you would expect by

trying to learn HTML5 in this series of lessons. Okay. So once

you get to the end of this lesson undoubtedly you're going to

have questions. Why did he do that?

What does that mean? Okay. That's great. You should have unanswered

questions once you finish this lesson. All those questions,

I promise, will be answered throughout the remainder of this

series of lessons. So don't get discouraged.

I can't emphasize this enough. At this point in time I need you

to follow along and do exactly what I do in your copy of Windows

Notepad, please do yourself a favor and follow along by actually

typing the code.

This is easily the best way to learn. Don't cheat yourself.

You've already invested the time to watch this video. So get

the most from that investment by taking a few moments and making

sure you do exactly what I do in your own copy of this Web page

that we'll be building. Pause, rewind the video if you need to,

but make sure that you follow along.

All right. And to follow along, what you're going to need to

do is download a file called lesson two.zip or whatever they

called it once they uploaded it to Channel 9.

Download that file and you should be able to see that there's

a lesson 02 file inside of that zip file. And you'll have three

sub folders, a before, an after and then a work folder. So the

thought process is this: I have all the files you need to begin

this lesson here in the before folder. So in this case I'm going

to select all these files and copy them and then I'm going to

paste them into the work folder where I'll do the majority of

my messy work. And then at the very end I'll copy my work out

into the, whoops, into the after folder so that you can compare

the work that you've done with the work that I've done. You can

see how it all goes. So I would encourage you to follow that

exact same process throughout the remainder of these lessons

as you're following along.

One other thing, you'll see in my version of Notepad

I have increased the size of the font significantly for your benefit.

If you're streaming this video on Channel 9 and that looks garbled

to you, if you cannot read that, this means that you need to

download and watch the video locally from your own computer.

That streaming is just not going to work for you, possibly due

to the speed of your Internet connection and the way that Silverlight works.

So just wanted to make sure you understand that. Go full screen,

if you need to, in order to see things clearly.

So with all of that, we've already copied our work into the work folder.

I'm going to double click the before.txt file and what I've created

here are two articles and I want to keep them on the same Web page.

I'm going to use this as the basis for the Web page that we're

going to create. These two articles are helpful because we get

to format them but also because they have some beginning information

that every Web developer needs to know. Now I could read all

this to you in a camera, which is going to be kind of boring

or you could read it for yourself as you work through this example

which would probably be kill two birds with one stone. Also notice

that because this is such a long, long document, and I've already

recorded this video once and realized how long it was, I have

gone and added some HTML tags to several different key spots.

So we'll be skipping over many of these definitions of paragraphs.

This tag defines an opening paragraph tag and a closing paragraph tag.

We'll talk about that more a little bit later. But I just wanted

to point out to you I've already done some preformating of this

article for you just to save a little time.

And then if you scroll down, scroll down, scroll down, scroll

down, you'll see a bunch of double lines I used equal signs and

this is where one article ends and the other article begins and

we'll chop this out at some point during this video.

So here we go. We're going to open this up. I'm going to select

it all by hitting control A on my keyboard and control C to copy

it to the clipboard and then open up a second copy of Notepad

and paste it in.

This time I'll click file save as in the new file and I'm going

to navigate to my

lesson 02 folder, the work folder. I'm going to change the save

as type from text documents to all files.

I'm going to change the encoding from ANSI to UTF 8, and I'll

discuss UTF 8 very briefly in lesson 4.

Just follow along for now. Then I'm going to type in lesson 02

no spaces.HTML

and then click the save button. Now I'm going to verify that

I did this correctly, I'm going to go back to Windows Explorer,

look at my work folder and I should see the lesson 02 Web page

and Internet Explorer logo set to be default browser.

Great. So we're on our way, if we were to try to open this up,

you can see that since I've added some formatting, we get some

paragraph distinctions here, but there's very little formatting

involved and now we're going to set our minds to adding the rest

of the HTML5 required to make this a real, real Web page.

So let's go ahead get started at the top of the page. I'll use

angle brackets.

Right above the comma and period key. They're used exclusively

in HTML you'll need to become familiar with those keys you'll

be typing them tens of thousands of times throughout the course

of your career.

And so we're going to open one up. So let me just say this.

The opening and closing of angle brackets represents a tag in HTML.

Like you saw a little bit ago, you create a tag by giving the

tag a name. In this case that's a paragraph tag.

Usually what you do is you create an opening paragraph tag and

then a closing paragraph tag. They look identical except for

the leading forward slash so this would dictate a paragraph and

anything in between the opening and closing paragraph tags would

be formatted as a paragraph in your document. Now you can create

other things, other information inside of this, for example,

if I wanted to put a hyperlink inside of it I could do that,

click here.

But never would I take this anchor tag and put it outside of

the paragraph. That would be improperly formed, because the paragraph

tag started before the anchor tag, therefore the anchor tag must

finish before the closing paragraph tag. All right. So this

would be bad.

This would be good. All right. And we'll talk about what all

these mean a little bit later. So back up to the top. We're going

to open up an angle bracket, use the exclamation mark and type

in doc type space lower case html.

That tells the world that you are creating an HTML5 document.

We'll talk about what doc types are in lesson number four.

Let's not worry about them right now.

I think it's also important to notice that even though we talked

about opening and closing, some HTML tags do not need a closing tag.

So you don't need that in some cases. Now, which cases, that's

where a little... there's a little bit of a learning curve, admittedly.

There's also an instance where you might see in older versions

of people's work in HTML something like this, where there is

a forward slash at the very end of the tag. This is not something

that's necessary in HTML version 5, but you might see it in previous

versions of HTML. That's just roughly the equivalent of doing this.

It's just a shortened version of it by creating a self-enclosing

tag and it only works in certain circumstances and it's only

necessary in other versions of HTML. All right. So by and large

follow and do exactly what I do and we'll learn the rest later.

Okay? All right. So let's move on.

Every HTML document is defined by an opening HTML

and a closing HTML tag.

Like so. So I went to the very bottom and typed the closing.

So that defines the boundaries of the HTML page that we're creating.

Back to the top. Every HTML page is composed of two parts.

There's a head and a body. The head section has extra information

that's needed to render your Web page properly, but it's never

seen as you display it into a Web browser. We'll talk about

this more in a little bit.

So let's begin with the head and slash head just get that ready.

And below it I'm going to type in body.

Whoops, body.

An opening body tag and then near the very end of the Web page

where I type the HTML tag, right above that inside of it I'm

going to type in the/body tag.

So now we have the makings of a real HTML page.

One other thing I want to do, I don't have to do this. Many people

do not. But I'm choosing to do it. I'm going to add an attribute.

Now, attributes are extra information that help

define properties and attributes of a given tag. We'll see this

a lot in the remainder of this series. So the first thing you

type in is the attribute or property's name. In this case I'm

going to define the language for this document. I'm going to

use the equal sign. So I'm going to set this property, this attribute

equal to

open quote close quote and that says this is going to be the

value and inside of that I'm going to type in the letters EN

for English.

So attributes or properties can be set in HTML tags by leaving

a space in between the tag name and the attribute or property itself.

We use the attribute or property name, an equal sign indicating

that we want to set that property equal to and then the value.

Now, in HTML5 you might see people leave off the double quotes.

That's fine. I've chosen to include them and there's a technical

reason why I'll discuss much, much later.

I'm getting into the habit of doing that. If I have a second

or third attribute, I can just continue to append them inside

of the closing angle bracket.

Here is another

value and another. And I'm just making these up, okay? But you

can see the pattern here is to continue to include spaces and

then another

property attribute name equal to another value. Okay. Just delete

all that junk.

And there we go. Looks great. Inside of the head I wanted to

find the char set. And we'll talk about what the char set is

in lesson number four very briefly. But for right now follow

along and do what I do. I'm creating a meta tag, and I'm setting

char set equal to open quote close quote inside of the quotes

I'm going to type in UTF-8.

And then a close angle bracket. We'll talk about that later.

And here I'm going to create a title for my document. And the

title will be displayed in either the title bar in Windows like

you see here lesson 02 Notepad or in the case of Internet Explorer

in the tag name above the page you're currently viewing. So that's

the purpose of the title. And I'm just going to grab this text

right here and I'm going to paste it so I hit control C, control V.

And now I'm going to move on to the body section. And I'm going

to define some sections within the body, I'm going to create

a part that is called the header information.

I'm going to create a section of my document that will be like

the main section where all the articles reside. So we'll start

the section and then at the very, very bottom

prior to the copyright notice I'm going to end the section.

While I'm down here, I'm going to create a footer section or

a footer to define this area down here as

the bottom-most

additional information about, in this case, a Web page.

We'll talk about head, section, footer and like lesson 6 I believe

so table that thought for now. And go back up to the top now

that I've created the sections I know there are two major portions

of the section, two articles. So open up the article and then

I'm going to look for that line that I drew in this document

to delineate the two articles.

There we go.

So here I'm going to end this article

and I'm going to begin a new article.

And I'm going to delete this big line. I don't need that anymore.

I'm going to go to the

end of the section I'm going to type in slash, the end of the

article, completely enclose it, save all my work and now let's

open her up in Internet Explorer see what we have and you'll

say to yourself this doesn't look any different than before.

That's correct. At this point we're not styling any of these

tags, we're merely giving meaning to the document, to the sections

of the document and I'll explain why we want to do that and why

it's so important in HTML5 in the next lesson or in lesson No.

4, actually.

All right. But we can see in our tab, we can see the title that

we typed in, so we have that going for us, right. Let's close

that down.

Let's go back to the very top and work on our header. And the

header is where we're going to create ostensibly a logo and maybe

some navigation.

So here I'm going to use an H1 which is basically saying a very

important piece of information and then an H2 a slightly less

important information, we'll define exactly what it means later.

Then I'm going to wrap these in a header group.

So I'm going to say these belong together and should be treated

a little bit differently than they would normally be treated

in the body of my document or in the article section of the document.

We'll talk about this later. Also inside of the header I want

to create... in fact I'm going to do some indentation here.

Let me push some of these tags two spaces in, two spaces in,

so I get this nice hierarchy and it's visually for me not because

it's going to improve the document in any way, it helps me see

the overall structure of the document in this way.

So I'm going to also add a navigation area in this header section

and to create that navigation section I'm going to use a list

of items. This list of items will be unordered, therefore I'm

creating an unordered, a U list. An unordered list and it's

going to consist of three items. List items. So I'm just going

to go ahead and create

list item and then I'm going to copy, paste, go to the next line

and paste.

Also so let's go ahead and just create home.

About. And then contact. And so if this was the beginning of

a larger website, we might have navigation to several different

pages of our website. You've seen this hundreds of times through

the websites that you've visited, I'm sure. Okay. And additionally

at this point let's just look at how this is rendered in the

Web browser briefly.

As a series of bullet points. We'll change how it's rendered later.

But none of those were hyperlinks. And so we want to add an

anchor tag and we're going to point to a specific place where

that would be that link will be

referencing so that when the user clicks it they'll go to the

location inside of that Href attribute that I've left blank for now.

Since I don't want to spend too much time on this I'm not going

to give it an actual location. I can do something like Bing.com

here but I don't really want to do that at the moment. And I

don't have any other Web pages. So I'm just going to create these placeholders.

I'm simply putting a pound symbol as a placeholder in each of

the hrefs for now. Maybe some day we'll come back and link those

up correctly to other Web pages on our website, other websites

or what have you. Now I've highlighted the entire navigation

section I'm going to copy it because I want to put it in the

footer as well. So I want it like most Web pages do to have navigation

at the top and at the very bottom of my Web page.

Add spacing in there and now I'm going to go right up to the top.

I have my header in great shape. Now let's move on to our main

section, which contains two articles. Let's start with the first article.

Here we have a title and then a section of the document or a

part of the document. So the title of the article I'm going to

give that a headline or a header of H1 that will make it the

most prominent part of this article.

And since then the first paragraph or two is an introduction,

I'm going to give this introduction word a header too which makes

it a little less important as we think of a hierarchy or an outline

of our document. And I'll do the same thing with this brief technical

overview of the World Wide Web I'm going to give that an H2 and

a closing H2 tag.

All right.

While I'm here, you'll notice that I don't have paragraph tags

defining this paragraph beginning with the words in this article

I'll describe blah, blah, blah. So let's go ahead and add a paragraph

tag before and a closing paragraph tag after that paragraph.

The paragraph that begins the World Wide Web started out as a

means for sharing and so forth, I'm going to add a paragraph

tag beginning and then an ending paragraph tag, and then from

that point on you can see I've already taken the liberty of adding

paragraph tags through the remainder of this document. So that

will be the last time you'll need to define those. Great. All right.

Let's scroll down to the next interesting part, which is you'll

see something that starts with httpmessage.gif.

Here what I want to do is include an image inside of a figure

and a figure, if you think about books you've read, it's something

that's important

to the discussion but it's included outside of the paragraph

for reference sake. It could be even included on another page

and we're merely referencing it here. So I want to display this

image and you'll notice it's this image http message here that

I've added to my work folder when we first got started. And so

what I'm going to start off doing is by defining a figure,

and I'm going to enclose this whole thing in a closing figure.

And then what I want to do is start creating the image. So I'm

going to go two spaces in open angle bracket Img space and I'm

going to use the file name as the source property. Src equals.

That means where am I going to find this file. I'm going to

set it equal to the file name in the same folder where you find

the lesson 02 HTML file. And then what I want to do is add an

alternate message. This will show up for those people who can't

see the image for some reason. Perhaps their browser won't load.

Perhaps they're vision impaired and their screen reader will

read aloud this alternate message instead of displaying a useless

image in their case Then notice at the very end of that ALT that

I set I close the image tag

and I don't need a slash image in this case and I don't need

a self enclosing image. Now you might see this in older versions

of HTML but you don't need it in HTML5.

Furthermore I'm going to add a Fig caption around the text.

And so this will associate

this caption below this image that will be displayed. So let's

see what the result of this is in our Web browser.

Scroll down a little bit. You can see that here we have the image displayed.

Furthermore, we have this figure caption displayed underneath

our image. Awesome. Okay. And continuing down, we'll get another opportunity.

So I'm not going to spend as much time. I'm just going to define

an open and closing figure.

I'll define an image and I'll set the source equal to this other

www.diagram.gif ALT equal and then just use this text diagram

of route

from the user's request to the Web server back again and I'll

close the image.

Go to the next line, two spaces Fig caption and I'll close the

Fig caption

like so and I'll close that and see how it looks in our Web browser.

There's our first image and our second image note it's a neat

little image that shows the progression from the client to the

server and back to the client again, and it explains what each

of these little callouts are for. All right. Let's continue on.

What are domain names? I'm going to wrap that in yet another

level down in our imaginary outline we're creating for this document

by giving it an H3 heading. So the H3 heading will be used to

make it even less prominent than the others.

Here's an opportunity for some formatting. What my intent is

to kind of format it the way it looks on screen. However, if

we were to look at this photograph as it's defined currently,

it's not going to create the proper vertical spacing. In this

case what I want to do, I still want to keep it all as one paragraph,

because in my way of thinking, it's still all one complete thought

that needs to stay together. So I'm thinking semantically, I'm

thinking about the meaning of the tags that I'm using, not just

how it's going to look on screen, and yet still in this context

I need to have some spacing. So I'm going to add this break.

In fact, I'm going to add two of them. These breaks. BR tags.

And when I do that, let's refresh the browser and then take a

look at this again. It's still one paragraph, but there have

been a line break and a line break. Okay. That's exactly how

we want this to work. We have another opportunity to do this below.

So we can see we have a paragraph beginning and at the very end

a paragraph ending. So what I want to do is add a series of BRs,

pretty much everywhere where there's an empty space at the end

of the line. I'm going to add a series of these.

And I didn't have to do it. I could like remove all the spaces

like so. That would work just fine. White space does not matter

in HTML. It will be largely ignored with rare exception.

Okay. So let's go ahead and refresh the page and see that we

get the formatting that indeed we want for that paragraph.

Great. Let's move on here.

All right. Again, in my imaginary outline I want this to have

a little less prominence. It's a sub point of something we spoke

about earlier so I'm wrapping it in a beginning and ending H3

header tag. I'll keep going down here and in the recap I'm going

to come back out one level of my imaginary outline and wrap that

in a header 2.

All right. And then here we have another interesting situation.

What I want to do is render...

you can see that there's from a purely technical perspective

you should now understand a few things. First of all, second,

hopefully, third, hopefully, fourth hopefully, fifth and so on.

And what I want to do is create an ordered list

of these items, because they all need to be kind of understood

together and in a certain order. So I'm going to create a closing

OL tag. And I'm going to wrap each of these items with a beginning

list item and an ending list item, tag.

Again, beginning list item, ending list item,

beginning list item, ending list item, beginning list item

and ending list item and

finally I remind myself not to type so much next time, a beginning

and ending list item. All right. And at the very end of that,

a closing ordered list tag.

All right. So let's save all that, now let's see how it's rendered

in the browser.

All right. And notice the default rendering uses this ordered

list and instead of bullets it uses numerical scheme one, two,

three, four, five. Okay. Awesome. We may come back and change

it at some point but it's the default way it's rendered in my browser.

And one final note about our review. And I'm going to wrap that

in an H2 and a closing H2

and that should be about it for our first article. So now let's

move on to our second article.

And here I'm going to add an H1, since it's the

title of the article.

And here I'm going to add another paragraph

tag around... there are four major parsing and rendering engines

that are popular.

Here the order doesn't matter. So I'm just going to use an unordered

list to describe these four different parsing engines.

And I'm going to wrap each of them in an LI and a closing LI.

LI and a closing LI.

LI, closing LI. LI.

And closing LI.

All right. How are you doing? Are you hanging in there?

It's a lot of work. Whoops. Something looks not quite right.

If I look at this Web page and see that everything looks about

the same, that tells me that I probably forgot or misspelled

something on the very end right here. So let me look back at

my work.

Yes. I don't know what I was thinking. I started with an H1

but I ended with an LI. I can't talk and type at the same time, clearly.

Save that. And now let's refresh.

All right. And this is why I test often when I'm working, to

make sure that I catch problems as they pop up immediately.

So you can see the unordered list rendered out as a series of

bullet points. That's perfect. Let's continue on.

What do I mean when I use the terms parse and render, let's wrap

that in an H2, make sure we type H2.

Okay. And then characteristics of an HTML5 Web page another H2

and slash H2.

And here's an interesting dilemma that we have. Now, what I'm

trying to do is describe the doctype element much like what we

created at the top of our HTML page. But in this case I want

to render it to screen. Let's see how it looks by default.

Notice it just leaves off the opening and closing

angle brackets.

Well, actually, type this, it's not even showing the doctype

at all. It's just got these linked types. It's ignoring everything.

And the reason is because we need to use HTML encodings instead

of these reserved characters. So in this case I need a less than symbol.

So I'm going to use the ampersand LT for less than and then a semicolon.

We'll go to the very end and we'll use a greater than symbol.

So the ampersand GT semicolon. So this and this designates that

we're going to use an HTML encoding and whatever is in the middle

will be a special symbol. So there are like dozens of these HTML

encodings to get around special symbols.

So, for example, if I wanted to use an ampersand, it would be

largely ignored but we could do

ampersand, a-m-p.

And then a semicolon at the end. So you really in this case

need to find a cheat sheet or reference book that will show you

all of the possible HTML encodeings. I don't want to take the

time to go through that, that's more of a reference material

sort of thing. But you'll at least understand why they exist.

Now when we refresh this Web page,

we can see that that tag is represented to the user correctly

as an HTML tag and yet behind the scenes we're not using the

greater or less than symbol per se just the HTML escape or encoding

version of it. Okay. Let's continue on.

And we're almost, almost done. So I'm going to go to the very

last section here and I'm going to add an aside

and I'm going to intentionally misspell this as AIS because that

will be a great lead-in for the next video.

You won't notice the problem in the Web browser per se, but when

we go and try to see if there's any errors with our Web page

and what we've done, we'll find the errors then. Okay. So let's

wrap this final conclusion in an H2.

And then wrap

this final paragraph with opening and a closing paragraph tag,

and then here at the very bottom in the footer section we want,

this is like lawyer-speak, the copyright notice and all that,

so we're going to use a tag called small. Now, that doesn't

mean this is actually going to be rendered out small per se.

We're giving meaning to this content saying it's like legalese.

We'll talk about this more in lesson No. 5 or 6, I can't remember which.

Okay. Here is another instance where there's an HTML encoding

for the copyright.

In some cases, like the copyright, for example, you're encouraged

in HTML5 to not use the HTML encoding, instead what you need

to do is bring up a character map

in Windows and I think every version of Windows has this.

And then in my case I'm using the Courier New Font. I'll find

the copyright notice right here copy and select it and I'm going

to paste it over

what I have there and that should retain its formatting because

I saved it as UTF-8.

Now let's see and make sure that this Web page still looks good,

renders well, as we scroll through it. It looks perfect.

This is where I'll stop the video.

We're done giving structure and meaning to our document. In the

next video we're going to apply cascading style sheets to make

it look a little prettier. We'll see you in the next video.

Thank you.

For more infomation >> HTML5 CSS3 Fundamentals:Development for Absolute Beginners 02/21:Creating Your First HTML5 Web Page - Duration: 35:14.

-------------------------------------------

Greenfield residents were ready for another snowstorm - Duration: 1:42.

HIGHS: 30-34

SOME OF THE HIGHEST SNOW

ACCUMULATIONS FROM TODAY'S STORM

WERE

IN FRANKLIN COUNTY.

22NEWS REPORTER ALESSANDRA

MARTINEZ JUST GOT BACK FROM

GREENFIELD WHERE PEOPLE WERE

ENJOYING THE SNOW UP NORTH.

I MET ABOUT A DOZEN TRUE NEW

ENGLANDERS TODAY WHO WERE

BRAVING

THE COLD, IN THE MIDDLE OF THE

STORM, MAKING THE MOST OF THE

WEATHER.

WHILE THE SNOW SEIZED THE DAY,

GREENFIELD RESIDENTS CAME OUT

TO PLAY.

FRIENDS MATT AND ANDREW STRAPPED

ON THEIR CROSS COUNTRY SKIIS AND

HEADED DOWNTOWN.

I JUST BOUGHT THESE SKIIS LAST

YEAR DURING THE

WINTER WHERE WE DIDN'T HAVE

SNOW, SO I WAS EXCITED AT MY

FIRST OPPORTUNITY TO GET OUT.

LAST YEAR WAS A BUMMER OF A SNOW

YEAR, AND SO

WE'RE REALLY TAKING ADVANTAGE OF

IT NOW HERE IN GREENFIELD.

THERE'S AN AWFUL LOT OF

SNOW HERE, AND MORE TO COME, AND

WE'RE JUST HAVING FUN IN IT.

SUNDAY'S SNOW IN GREENFIELD

ADDED ABOUT 5 INCHES TO MORE

THAN A FOOT OF

SNOW THE TOWN GOT ON THURSDAY.

PLOWS CLEARED STREETS WHILE THE

SNOW TAPERED OUT IN THE EVENING.

SOME SIDEWALKS STILL HAD A THICK

COATING, BUT ONE NEW JERSEY

COUPLE

WAS JUST THANKFUL TO BE WALKING

IN A WINTER WONDERLAND.

WE HAD TO DRIVE EVERYWHERE, SO

IT'S COOL

BEING ABLE TO LEAVE IN THE

MIDDLE OF SNOW STORM AND

ACTUALLY WALK DOWN FOR SOMETHING

TO

EAT.

FRANKLIN REGIONAL TRANSIT

AUTHORITY HAS NOT ANNOUNCED ANY

DELAYS FOR

MONDAY MORNING.

THE STATE'S DEPARTMENT OF

TRANSPORTATION ANNOUNCED MORE

THAN 3,000 CREWS ARE WORKING

ACROSS THE STATE TO CLEAR AND

TREAT THE ROADS

TONIGHT, SO DRIVERS HAVE A

SMOOTH COMMUTE ON MONDAY.

ON MY WAY DOWN HERE TO CHICOPEE,

I SAW THAT MANY SIDE STREETS

BETWEEN

FRANKLIN, HAMPSHIRE, AND HAMPDEN

COUNTY STILL WEREN'T PLOWED.

IF YOU'RE GOING TO BE OUT ON THE

ROADS EARLY TOMORROW MORNING,

YOU'RE

For more infomation >> Greenfield residents were ready for another snowstorm - Duration: 1:42.

-------------------------------------------

생일 선물 준비하기 Preparing Birthday Gifts for Lyung-ha - Duration: 12:20.

bowl of rice serving with toppings

salmon..

it's like Churasi-dong

salmon salad with three kinds of sauce

it's really thick

salmon nigiri, you can choose row or slight cook

let me try

good? is it also just okay?

salmon is...

it must be tasty

first gift, hoodie

please wear it, lyung-ha

you should try.......

(there's no new one what we want to buy)

second gift, hand cream and body wash

I will show this video after her birthday

card slash~~~

take my money~~~`

go buy something and let's go starbuks

came to buy paper bag and letter paer

this is good!

this is also really good

let's get something simple, like this?

uhm.. the size should be like this much big?

is there like brown-ly?

(in the end)

egg~

I don't know what flavor it has

looks good, look at this

dark chocolate

this much should be good for dieter

appetizer~

like, looks pretty but we don't need to say a lot

no word to say to her actually

we always talk on kakao

how about like this?

is it letter paper?

no?

oh, it's paper

it's mirror

ah, mirror, paper mirror!

oh, here

oh this is cute

oh 500won, that's resonable

I will buy something different

ah so cute

that size perfect

how come all looks so kid-ly

I would like to get things look adulty

ah so cute

It looks so adulty hahahaha

hold on

cute cute

700won, ohhh

oh btw I dont have envelop

Don't get on this line

why does this have a lot

why two inside?

also here

if it's big.... I dont have too much word to say

sorry lyung-ha

I will get here

this looks good

how about this?

it looks like for propose

propose?

well... I don't have anyone I propose to, so I will do for her

I will get this, idk

she might know we buy all together

the worst design so far

I will I can see this in Luck bag soon

if I open the box and this comes out, I would feel like burn it

what's this? mug?

looks nasty..... like bugs

many people now

so, what I should get......

I havent decided

dolce latte?

I feel like It makes stomach ache if I get dolce latte

but I think double shots also

vanila double shots, without ice

mango frappuchino

without tea

not many people here

uhmmmm, very heavy

getting idea for making cake

um, the colors make it looks like harrypotter cake

pink color..

we don't make harrypotter cake, um..like..

butter cake?

but no butter?

draw Mal-rang?(*she's her puppy)

can you?

yes

how Malrang looks like?

pop her picture up!

I have!

draw Malrang!

Malrang... just um.. Maltese

I was used to draw well

lyung- ha doesnt have character...

hosun,

oh that's cute

let's do heart shape

cute, heart

Don't draw Malrang

what's it

she's Malrang

what's this lol

burmuda-triangle

hey, you drew this!

mine is little better

it looks like Bru-Bru

you ruined!

I haven't finished

isnt it bear?

don't draw Malrang, it must be spoiled

HAPPY and Lyungha as small letter and day

I think capital letter would be fine

it's too pact I think cuz lyungha's pretty long

then, do LH

HAPPY LH DAY?

Happy Nonghyup day(*Nonghyup is a name of bank)

right, It's Nonghyup

Happy Ssal day (*her nick name is Ssal(rice in korean)

rice day?

happy rice day

then, the last draft is..

went to CGV in Hyundae department store for watching movie

how much is a bottle of water here?

(it was 1500won)

we got two bottle of water 500won each at right upstair

isnt it like popcorn smell?

what's that?

omg, me, Charmander

you should get a Charmander

go inside!

the battery is only 1%

yesss gotcha!

so cold

Samwon sangsa ( to buy ingredient for cake)

hwang lyung ha..

you gotta bow to us lol

I'm serious

so cold

but the lyungha birthday is near Valantain

so there is a lot of ingredient

right?

whoa too many people

can we put just this on cake?

instead of cover chocolate

the salmon nigiri was good and double shots was sweet and strong

Hyunbin was so good looking on the movie

it was really cold 9 Feb in 2017

end!

For more infomation >> 생일 선물 준비하기 Preparing Birthday Gifts for Lyung-ha - Duration: 12:20.

-------------------------------------------

Learn Colors Play Doh Strawberry Hello Kitty Molds Fun and Creative for Kids Nursery Rhymes Star - Duration: 6:45.

Learn Colors Play Doh Strawberry Hello Kitty Molds Fun and Creative for Kids Nursery Rhymes Star

For more infomation >> Learn Colors Play Doh Strawberry Hello Kitty Molds Fun and Creative for Kids Nursery Rhymes Star - Duration: 6:45.

-------------------------------------------

Phillip Stothard - Developing Interactive Virtual Reality Simulations for the Mining Industry - Duration: 45:22.

>> My name's Andrew Woods.

I'm the manager of The Hive.

So welcome to this new facility.

I know some of you have been here before.

But those of you who haven't, it's a new facility designed to encourage and enable

and facilitate research activities in fields relating

to visualisation, virtualization, and simulation.

And obviously the main visible portion when you walk

into this space is the four large scale display systems.

And hopefully you'll have a chance to come through this space at some stage

and get a demonstration of all the capabilities of the various displays.

The purpose of today's get together is a talk by Dr. Phillip Stothard, who's with the W.A. School

of Mines, and he'll be talking about the use of virtual reality

and simulation in the mining industry.

So over to you, Phillip.

>> Phillip Stothard: Thanks everyone for coming to see what I've got to say.

The talk I'm going to give you today I'm just going

to give a short PowerPoint presentation that's just a summary of,

sort of, a 10 to 14 year project.

It's pretty well a summary of introducing the new technology, sort of 21st Century technology,

into an old established industry with quite a resistance to change.

But as you present new technologies in an incremental fashion you can build up momentum

in the industry and they gradually take the technology on.

So the project that I worked on was actually developed at UNSW when I was

at the School of Mining of Engineering there.

And the visualisation systems, as we go through the presentation, were developed in the School

of Mining, the first ones, just from hardware we brought together.

VRS from Queensland and then iCinema from UNSW.

So there's a progression of technologies.

But what I would like to talk about is not just the development of technology,

but also some of the background information and how difficult it is to get that to integrate it

into the virtual reality simulations.

So just to set the scene and give you an idea of why we did this.

The project aim is to provide a safe and forgiving environment to mine workers

so they can actually learn about mining operations because mining's a very complex area

and the issue with it is most of the problems that people have to contend with,

they're actually buried underground.

And it's a 3D problem.

And it's very difficult to visualise that just by discussing it

with 2D drawings and text, et cetera.

One of the key catalysts for this particular project was that, since the 1970s and 80s,

mining machinery processes and the way that mine operations and the way

that people work have changed significantly.

And, sort of, combat that and look at safety.

Many complex rules and schemes are introduced to improve safety and manage risk.

But one of the bad things of that was that there are volumes and volumes of information.

And you can see on that chart there that's just a very brief snapshot

of all the work procedures, legislation, rules and regulations

that would apply to one specific task.

So there're all these rules and regulations.

There have come some controls over risk, but the problem was that accidents

and injuries are still a care and, unfortunately, fatalities, as well.

So what the industry were asking was, is there a simpler method for us

to present information rather than have loads of text and drawings?

Can we use a visual media to do that?

So what we did, we developed a four stage project-it seemed

to be a long-term project-and the idea was that the first part would be a feasibility

and scoping study to look at what technology was out there.

Develop a prototype.

Do some field testing in-house.

And then the third part would be to develop an industry prototype

to see whether the industry really liked this technology, how they would want us

to enhance it, and eventually move it

in to full industry scale projects and for commercialization.

And that's the state that that project is actually at now

where it's become a commercial entity.

To give you an idea of the project timeline, it's now 2014,

but the project took pretty well 10 years.

From 1999 the concept was conceived, the scoping study,

and it went through all those various processes there.

And it went from just a pilot project to an enhanced industry project.

And it also went from coal to hard uranium and then started to bring the simulations

into mining education, Australia's education programme, and then back,

again, project commercialization.

So with virtual reality, just to give you an idea of the concept,

and this shows pretty well the data when this was first brought together

because it was talking about Sega [phonetic] Games [phonetic].

I don't even know if they're still around.

But the idea was, and some of these parts of the VI simulations never really go to fly properly.

In there I was just talking to some people before and we should probably revisit those,

but the idea was that ultimately we want to build a knowledge management system

where mine workers, equipment producers, safety people, trainers, et cetera,

they can actually build and maintain a knowledge management system.

So we're looking for them to build best practice through collaboration.

So the idea is if they've got a problem in one mine or one area how do they solve

that problem and they share that information.

We want to develop safety management plans with input from companies, conferences,

and studies to bring this information together.

We're looking for people to provide information from relevant sources so the idea is

that we take the best practice and people try to keep raising that up

and make sure the system is continually improved.

An important part is that we want any simulator to actually be a game-type simulator

so it encourages people to interact with it rather

than passively sitting in lectures similar to this.

And the idea is that we would train people, continually up skill them,

and maintain their competency, but also their proficiency in the way

that they operate equipment and work within the environment.

An issue that we were looking at, as well, that we thought might be quite important,

is looking at risk-taking behaviour.

Are people prone to risk-taking behaviour in the industry?

And, as you see with some of the VI simulations I've showed you before,

there's a lot of machinery there.

And some of the rules and practices are very complex so people tend to shortcut them.

So ultimately we're looking for competent workers.

They're more risk aware before they ever go out on site.

The system continually feeds back on itself and we've got that process

of continually improvement and gradually build this best practice.

[ Background Sounds ]

Some of the key aspects that we're looking at is that the system must be interactive.

It can't be passive.

So to progress through any VI simulations people must interact,

answer questions, or solve problems.

We're looking for a simulator that's modular so that we've got components from one location

that can actually be bolted together with another one and everything.

A bit like Lego work.

It's built in blocks.

It needed web access.

And at that time there was no real social media, like Facebook.

And I think that would probably be a good addition

for getting people to discuss some of these issues.

And we were looking at the New South Wales Australian capability in the first instance,

focussing on coal because there was a define problem there.

Some of the criteria talking to people in the industry

that we said what would you want in this type of system?

One of the things is cost.

It was an unproven technology and it needed to be afforded or relative

to the small size of the mining market.

I know everybody thinks that mining's super rich but it's quite a small market.

And to get technology like this into there it needs

to be quite cost effective and actually support everybody.

They wanted that [inaudible] to realistic images,

not just cartoons or stick creatures within there.

That was considered quite important.

The trainees must make decisions and also experience the consequences.

And you'll see that in one of the demonstrations that I show you after.

A key area, as well, that was considered essential for ongoing success,

was that the system must be simple and quick to keep up-to-date.

Now, again, I'll make a comment at the end about that.

I think that we're starting to move away from that as the systems got more complex.

And that comment there, also, proved to be essential during the development process.

The way that we got the technology together was that we did a feasibility study in 2000.

Went around various research organisations and companies.

Looked at what was being developed at various locations within the industry.

Looked not just at VI, but all types of multimedia technology, and the culmination

of that was we got the idea of what was out there.

Things ranged from $3,000 P.C.s, base systems, the [inaudible]

and CSIO [phonetic] were producing

up to the multimillion dollar aircraft simulators used by people like Qantas and that.

So essentially there were three options that we came up with that we presented to the client.

The first one, and just be reminded that in 2000 out on mine sites the idea of network P.C.s

in training environments, there's been a significant change over the past 10, 14 years.

So that was not a novel approach then.

But the key factor were there was a central database of information

that was actually providing safe work procedures and safe operating plans and developed

that forum for best practice so that's where the idea was that anybody could log in and approve

that or look at how people were doing things.

It's administered by century [phonetic], like, some sort of P.C. system and it's linked

to a knowledge network and safety management system by internet access.

That was novel then.

But there're all these social media sites now that has access to that link.

There's various trainee and P.C. views and the trainees then interface with various controls

in the VI environment and the idea is that the VI environment behaves

like it would do if they were in the real world.

That image that's on there I'll show you afterwards the sort

of resolution you can get in images.

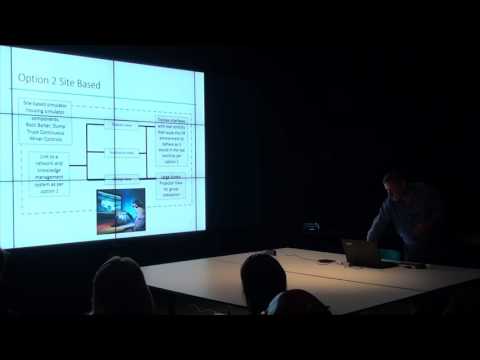
The second system was a site-based simulator.

The idea was that we had a purpose built facility like this put

out on a mine's rescue site, which was worked on a mine site.

The original one, this is in a room in the School of Mining,

and we set up a proof of concept system.

And the difference between that was that we tried virtual reality headsets

that have been tried and tested, data gloves, touch screens,

and joysticks at the various interfaces to interact with the environment.

You've got pretty much the same structure as the option one

but apart from it got the large screen.

So we were then looking for group interaction so this person here would do some action

and the group could learn from the action.

So you could learn from peoples-you know, make mistakes and learn from those-consequences.

But the group could also learn from that.

And then the third option was container-based simulators that are mobile

and can be moved around the mine sites.

They've become quite popular around various mine sites around Australia and elsewhere.

What we decided and recommended the client was that we would go for option two

because it was site-based and people would take ownership

of that technology and start to use it.

Whereas this might burn [phonetic] a container,

go out on site unless there was an integration plan it might not be fully utilised.

So we were trying to get people to engage in that and think about that issue.

Also we were looking at spatial awareness simulations within the mines.

We're looking at how you interact with the mine environment,

not just the trucks or shovels, et cetera.

[ Background Sounds ]

So we presented option two to the client.

There were some major concerns that the cost was just too high even for all three

of these options at that stage because it was untested.

So what they wanted was this lower cost approach and it was quite difficult

to keep the main gauge so they wanted to see that there was some sort of proof of concept.

So what I did, I applied for an infrastructure grant

through the University and built that room.

And it's fair to say that that was actually quite a turning point for projects.

They showed that there was commitment by the University.

And once we got that concept together industry started

to give us extra funding to build on that.

So that was quite a catalyst for the project.

Just to talk about some of the logistics

and actually what's required to build these VI systems.

We used 3D modelling packages like 3ds Max and Maya.

They're just industrial, off the shelf, modelling software.

I don't know how much you know about that but they're used in the film industry

and they're actually very powerful nowadays

and you can do some really quite high resolution rendering.

The issue is to build these models we need graphic artists and computer programmers.

And they're quite labour intensive to produce.

So that was something that we flagged quite early on and I'll speak

about that a bit more in a moment.

So we built some proof of concept coal mine simulations

so that underground coal environments.

Initially I had mining students just doing the modelling.

That wasn't sustainable.

So I needed to review that so I expanded the group to bring in different disciplines.

And also by doing that you have a richer environment

because not everybody thinks the same.

Engineers tend to look at engineering problems but artists look at the whole problem.

So some of the modelling was done differently.

We had good support from industry.

We got access to mine plans, photos, and mine access, which was fine,

but the quality of the information was not very good and we needed a different method to that.

The mine that we produced the industry said is great but our mine doesn't look like that.

So this is one of the issues that we're starting to come up with.

Acceptance of the technology.

Even within New South Wales, if you move from New Castle

down to Wollongong the underground mine environment

in the coal industry is quite different from site to site.

And people pick on that detail and that's where you start to get resistance for the technology.

So there's some sort of change of management that needs to be addressed there, as well.

They also wanted more group-based training and to tie into competent-based training, too.

So they didn't like the headset, the VI headset, because it removed the people from the group.

They wanted them to stay in the group and act and behave like they would do

if they were really working underground.

Just from the point of view, saying [phonetic] there, I've done this chart with a paper I wrote

with Andrew quite a while ago now that was the issue of acquiring consistent data.

Virtual reality is actually 100 percent computer generated

so everything's got to be generated by people.

And the justification for doing that, particularly in the coal industry,

and it's quite different from the [inaudible] industry, is that the risks involved

in taking electronic equipment underground.

Just as you'd put up a barrier for you to touch [phonetic] to go underground

and physically get image and reference,

so you have to build everything form an artistic representation.

A much more rapid development method would probably be augmented reality.

Unless of course you could just use reality economically and safely.

So that was quite a barrier.

And that's probably held back the development of VI simulation as being the development

of the virtual worlds that we show on these great systems.

It is quite an issue.

So that system went out into the industry.

It was funded by a research project by Coal Services and [inaudible]

where it continued to build capability.

We tried to improve the model development and implementation.

Make that more rapid.

Graphic artists certainly increased and speeded up that process.

But we were trying to, as well, set up a system of protocols for miners and train workers

and people out on mine sites to build their own simulations.

That just wouldn't happen, I don't think, at that stage.

It's not on their core business and they really weren't interested in doing that.

They just wanted a product they took and just used.

We established templates.

Tried to establish a flow of information form trainers, but some were better

as passing information over than others.

We decided to develop some proof of concept simulations, such as unaided self-escapes.

If there's a fire underground we need to exit safely.

Rib stability, which is a problem where the walls in the mine sometimes they can be loose

and it can fall on people and sprains and strains.

So we deployed a generic proof of concept to our system that at the mine's rescue station.

So there's one of the first systems we put out there, just for the touch screen.

That's now been superseded by iPad.

So that shows, again, the data, the technology.

So we just have a touch screen to interact with the larger screen there.

And this is actually a representation

of a person wearing their self-escape mask, their breathing apparatus.

And they've got to evacuate from the mine.

As soon as that system, even though it looks very basic, was put out on site,

the trainers used it straight away because it was a visualisation tool

that they could explain concepts to mine workers.

So it was quite valuable but it did tend to be used like an enhanced video.

[ Background Sounds ]

So that was a pretty successful implementation.

The industry were happy with it but they definitely wanted to lift the quality

of the simulations and see if we could improve the modules and to see

if we could look at a fresh approach.

We took stock and did a second scoping study.

Reviewed all the different simulated technologies, again, which, you know,

you can imagine over five years in the computer graphics industry things had changed

quite significantly.

We wanted to broaden the project.

And once we did that and established collaborative links,

the momentum in the project got going really quickly.

We started to use advanced gaming software.

We looked at talk but that fell away quite quickly.

Unreel, that fell away quite quickly because of licencing issues.

And then we used Virtools to develop the simulations because that has got a drag

and drop interface that allowed artists to start building the modules

as opposed to just pure programmers.

We started collaborating with iCinema because they were using this software and we were going

to use some of the large environments, as well.

So it just made access to large screen technology a bit simpler.

That's just an example of the drag and drop software that we were using.

So the idea is that we've got the 3D world that's been built and to put all the interaction

onto it we just dragged various parameters on and wired up a bit like it.

A wiring diagram that [inaudible] them to compile code.

And that's quite a quick way for rapid prototyping.

But the issue is that these, as you can see, those diagrams can get very complex

and very messy if they're not disciplined in managing those processes.

We started to look at interface and realtime later scams.

That was one of the objectives to start producing 3D models very quickly.

But, again, there's processing that ended up at the intervention of people to do the process

of later scans was the same as building a model like that

so we haven't quite got that worked out.

We recommended to the mine's rescue stations

that they utilise large screens to get that one to one scale.

We started putting images like that onto the screen, on those large screens.

[inaudible] industry in and that's what was a turning point.

It's a fair to say there that they actually said that's what we want.

A one to one scale.

Show people the real environment.

They feel like they're in the environment.

And we can show that the scale of things, the problems they would bring,

and really a way the project went.

So we installed that first 160 screen provided by BR Solutions

at the old mine's rescue station.

Again, these guys, as soon as that was switched on they were away.

I think what it was they had that technology and then it went

down for a week whilst we were upgrading it and they realised how valuable it was

in their training so it became quite a part of the training process very quickly.

So then once we got to that stage the coal services jumped into it and really engaged

in the technology and they decided they were going

to have all these systems at their mine's rescue stations.

So they've got four mines rescue stations in New South Wales and there's also some other ones

up around Queensland and that were deployed New Castle, Singleton, Lithgow, and Wollongong.

And they put four visualisation systems in each one.

The first one was in the original format.

The second one was an iDome like the dome behind you there.

Each one had an interface and joystick controls with high-end graphics cards

and people could actually interact with the mining environment right there.

The idea was that those would be one to three people for looking at specific tasks.

And then we went up to the large scale 10 metres where we can get groups of people

in and they can do their training.

I'll stop talking for a minute now and I'll actually show you some of the modules

that we can see on there and then I'll explain to you some of the other issues

that came up after we've done the modules.

So can you just help me drive these.

So I'll show you cut down versions.

There's probably 16 modules that we built for this project,

but I'll show you a couple of them.

And they've got cut down versions just so they'll run on my laptop.

But they are fully interactive when they're deployed on those systems.

[ Background Sounds ]

So the first one is-

[ Background Sounds ]

I'm always afraid of realtime demos because you never know.

There we go [laughter].

[ Background Sounds ]

So this is the underground virtual environment.

Where it's deployed onsite.

This can actually be in stereo but we only really use stereo

when we need to show a 3D problem.

Otherwise, we just use it in mono.

So if you just let it start up.

So this is deputy's inspection.

>> Inspected within the last two hours.

But now until the machines is on and the fan is running.

[ Background Sounds ]

>> You have arrived in the panel with a team comprising of two miner operators,

two shuttle car drivers, two [inaudible] operators, two support crew.

How do you proceed after disembarking the transport?

>> Phillip Stothard: So we've jumped forward a bit here

but we're actually still at the crib [phonetic] room.

So in this module, and the various other modules, this panel would be off to the side.

It wouldn't be off to the side.

It wouldn't exclude the view like that.

But all the people in the audience would have a click pad.

And to answer that question that they're discussing and you'd get consistent consensus.

So those grey boxes would either go green or red and the trainer or instructor can see whether

that somebody's getting the message or not.

And then if they're getting it wrong they can focus on that task and develop it.

So there's various options there.

And if the trainees have done the preparation they should be able to answer those questions.

>> What inspections are required before work can commence in the panel?

>> Phillip Stothard: So before you can actually do anything underground

in a mine there are some quite strict rules that you have to stick to,

as you saw from those rules and regulations.

And you've got to be able to work through those systematically.

So let's-

[ Background Discussion ]

>> Phillip Stothard: So this is for a deputy.

Before we ever start work the deputy's got to move from this crib room, here,

where his team's come to start work.

And he's got to navigate from here to the face and just do some basic inspections.

So I might just-like that.

So that actually A is the correct answer.

So now I've actually got to physically navigate.

Can you do that?

So just-you need to head towards where that guy is.

Just slow and then turn right.

So the idea of this is there's only one efficient way of inspecting that panel

and if we go the wrong way, so if you just steadily go

up towards the face it'll catch-just let it up catch up.

So it tells us we've actually got to go back.

And eventually the idea was that people would know the most efficient route

to go and inspect that [inaudible].

So if we do that, turn around, and then turn left down there.

[ Background Sounds ]

So within this environment you can see that it's a coal mine but it's quite light,

so you need to go that way but you need to go around the feeder breaker.

>> This is not the preferred route.

[ Background Discussion ]

>> Phillip Stothard: So the deputy will do his inspection.

When there's something this important the camera grabs him and we're going to look in there.

Are there any materials in there.

That should be full of roof bolts but it's not.

[ Background Discussion ]

And then we'll just turn around and walk up to the continuous miner

and then we'll go to one of the others.

So a point I would like to get from here.

This interaction, at the moment-this is an early module.

And the industry people that are helping us develop it-as the resolution

of these images is increased the industry input increases, was well.

When it's an early low resolution cartoon VI model we couldn't get an engagement.

But as we got more and more resolution, even though it's maybe not

as necessary educationally but for engagement, it was.

And for credibility.

So as the modules progressed and they got more and more experienced this text drops off

and it becomes a more find out and explore and learn type of training.

So you just need to-so it's asking is the support in the roof adequate.

But we shouldn't go down there because it's dangerous.

So just come back.

So that's a basic, sort of, training for deputies.

We've got the ventilation tubes in there.

So I'll just show you another one that shows a bit more severe consequence.

So, excuse me.

[ Pause ]

So this next one is the trainer's start to get used to the technology they thought, oh,

we can start to look at more risk management approach.

And the idea is that we want to get people's attention first

so that they know the consequences before they even started doing any training.

And that really focuses them.

And one of the serious issues in underground coal mining, in some areas, is gas outburst.

So we just let this run.

So this is actually-the good thing about VI, as well, is you can get impossible angles.

So these people in mining.

This is the shuffle cart that moves the coal.

There's a bump.

That's a seismic event as the lights are flashing.

And that's actually a gas outburst.

That's when people are mining towards a fault without putting correct ground conditions,

doing their monitoring, looking at geological indicators, water indicators.

That event is something that can actually happen if the ground control

and support is not done correctly.

And with virtual reality something that we can do that we can't do in real life

with a training exercise is we can come into the rock.

Sorry just let me look at the screen.

[ Pause ]

You can actually show how severe the consequences of that would be.

And then we can come back in and explain to them why that situation's happened.

And the reason is if we look there in the image this is an igneous rock.

So there's been a fracture in the rock and it's been in the sedimentary rock or coal

and it's been filled with igneous rock through certain volcanic activity.

And when you're mining towards that sort

of feature that's the stress regime changes quite significantly.

And unless it's controlled you'll get these coal outbursts

and they can be quite severe consequences.

But there are controls that you can put in place

and make sure you monitor them and you can prevent that.

So you can actually mine through there quite safely without having that event

but it's the way the mining is approach.

So you can see that through VI you can actually show people severe consequences and the power

of this system is that we could have-right there, there are 10 indicators

and we can have a team of six or eight people working in there.

And the impact of our actions by missing one

of these points is we could be one percent from a disaster like that.

And you could be working down there for week after week and not realise

that you're only that close to having a disaster.

And it's only luck that's kept you away from that.

OK so I'll move from that one.

So there are underground coal simulations.

So then we were looking at moving into hard rock and mining construction.

So we've got a surface mine simulation that's actually being constructive

and it was Olympic dam expansion was the site.

Unfortunately this project got caught in the global financial crisis in 2008.

So it was completed but it wasn't taken all the way into the industry

but it's still good from a proof of concept.

So this is working at heights.

And the idea is that people who have not worked

in the industry don't understand how complex the rules

and regulations are for doing operations on site.

So this technology we've got would be used to show them how difficult it is

to actually do an operation out on site.

And the amount of time and preparation that must be done before you actually go

out on the site and do any actions.

So I might drive this because it's-

[ Background Sounds ]

So we give the trainees an option to have a look at the site first.

So I'll say yes just so you can see the 3D models that are in here.

So this is a surface mine.

So within it for working at heights we've got scaffolding.

I've got a correctly erected scaffolding.

A poorly erected scaffolding.

And the idea is that they have to go along and identify what the problems and remedy those.

An excavation.

So you wouldn't normally think of an excavation when you're working down

but that's actually a working at heights problem, as well.

So we were looking at demonstrating that there's risk associated with that environment, as well.

And then this one was actually ladders-and I won't go all the way through it

because it takes a long time-but the idea with this was that that lamp.

The globe has gone in that lamp and these two guys need to change it.

We let them go all the way through the process.

Look at all the intricacies of the rules and regulations that they've got to apply to that.

But the real outcome is that they should get is that that lamp shouldn't be there so they've got

to use ladders or an elevated platform.

It should be up on the framework, worked, and re-engineered.

So it makes people look at re-engineering facilities so that they're actually safe.

And you cut down risk from that point of view because the tendency is if you, you know,

worked on building sites from years ago you'd just put a ladder up there

and run up and change the light globe.

But on a mine site it's just not acceptable to do that because of the risk.

So I'll just run one of these modules.

And there's another elevated work platform and I'll start that up afterwards.

So what this simulation does-can we raise that volume a little bit?

So the machine talks to us.

And what we're aiming towards with this was not instructor led training

but we're trying to automate this system.

And that's what we're looking at.

Reducing the amount of text on the screen with this simulation, in particular,

as though an occupational psychologist and look at peoples cognitive processes

and how we introduce information in the right manner so that they can build up schemers

in their head and take those out on site and reproduce them.

So he's got his helmet on.

>> Safety glasses.

[ Pause ]

You are now properly outfitted to explore the site.

>> Phillip Stothard: So he's ready to go just from a point of view

of going out on site to have a look.

And down here there it's all information within the filing cabinet there

that they need to work with, as well.

But let's just head home.

So, I'm trying to think of the best one.

We'll look at the excavation.

So before we start this simulation, the trainees, they get 100 points.

And the idea is that they need to maintain those 100 points

and each time they make a mistake they look five, or if it's a real consequence

or bad consequence, they'll lose them all.

So we have to run through a few things to get going.

>> The ground near an old wash [phonetic] [inaudible] has been contaminated

by a buildup of residue [inaudible].

It is being cleaned up as part of our environmental policy using a front-end loader,

or batco, and will be backfilled with uncontaminated soil.

The work was anticipated to take one day and no deeper than one metre.

Are you a visitor or member for the crew?

>> Phillip Stothard: So we say we're a crew member.

>> Inside the restricted area today is a no-go area unless you are a member of the work crew.

Please keep clear and following the instruction of any crew member.

Are you familiar with excavation procedures?

>> Phillip Stothard: So we say no.

>> Please pay particular attention to the steps indicated on the THA.

Are you familiar with excavation procedures?

>> Phillip Stothard: So we need to look at the task hazard analysis.

And what we're showing in here-I clicked the button too soon.

So that dialogue's come up.

But this is the sort of form and paperwork that they would have to fill in on site

to do their job hazard analysis and risk assessment.

And you can see it's quite a complex form.

But they need to report that back.

So let's just have a look.

So I'll say yes now.

>> Have you signed on to the THA?

>> Phillip Stothard: I think it will tell me I haven't if I say that.

>> Incorrect.

>> Phillip Stothard: Because I just looked at-

>> Have you signed on to the THA?

>> Phillip Stothard: I want the revised one.

There we go.

[ Background Sounds ]

I didn't pass this training myself [laughter].

>> Have you signed on to the THA?

>> Phillip Stothard: Let me get it right.

There we go.

[ Background Sounds ]

>> Please select the original THA from the filing cabinet.

>> Phillip Stothard: Yes that's it.

So I've gone through the wrong procedure as you can see [laughter].

So I've got to click on that one.

Come back.

>> No additional [inaudible] is required.

The oversight [phonetic] standard would be [inaudible].

>> Phillip Stothard: So that's the outcome that the system wants me to know is

that I don't need to put more safety equipment on.

And I just got a bit out of sync there because I forgot the [inaudible].

>> Please cite [phonetic] the revised THA from the filing cabinet.

[ Background Sounds ]

>> Phillip Stothard: So that's got a lot of information on that one there, so.

>> This modified soil disturbance permit required for this job.

The soil disturbance permit is now updated and will work at [inaudible] issue.

All pre-work issues have been addressed.

Work can now commence.

Some aspects of this task are now being performed to their correct procedures.

How many can you identify?

>> Phillip Stothard: So this is in training mode now.

So to give people an idea they've actually put question marks to give a hint

of where these problems might be.

[ Background Sounds ]

So then-

[ Background Sounds ]

So say no.

Each time I've made a mistake on that task hazard analysis I've lost five points

so I'm probably not going to be here on Monday.

But I'll stop there because this will go on for a long time.

OK? So that was working at heights.

Thanks. And I'll just finish up.

There's a slightly different module.

I realise it is twelve o'clock now.

There's one more that's done on a uranium mine in Northern territory

that takes a completely different method of producing those.

I can show that pretty quickly so maybe one minute?

>> What we might do is given it is twelve o'clock

and people might have appointments we'll stop it here.

Perhaps have a few questions.

And then there are some demonstrations that if people are I can stay behind

and we can look at those afterwards.

So is there any questions from the audience?

>> Phillip Stothard: If you have questions.

You don't have to take questions.

>> [laughter] Just start with one.

[ Inaudible ]

>> Phillip Stothard: OK.

Thanks.

>> You have any other questions?

If not let's thank Phillip for his presentation [applause].

>> Phillip Stothard: Thanks a lot.

For more infomation >> Phillip Stothard - Developing Interactive Virtual Reality Simulations for the Mining Industry - Duration: 45:22.

-------------------------------------------

Residents stock up on groceries to brace for another winter storm - Duration: 1:50.

HIS NAME HAS NOT BEEN MADE

PUBLIC.

PART OF GETTING READY FOR SNOW,

INCLUDES MAKING SURE THE PANTRY

IS

STOCKED WITH SNACKS.

22NEWS REPORTER HAYLEY

CROMBLEHOLME TAKES US TO THE

SUPERMARKET TO SHOW US HOW

SHOPPERS WERE RINGING THE

REGISTERS.

CART PUSHING NOISES

AS THE FLURRIES STARTED TO FALL

SUNDAY MORNING, SHOPPERS FLOCKED

TO THE BIG Y IN WEST SPRINGFIELD

"THERE WERE NO CARTS IN THE

PARKING LOT SO I WAS

AFRAID TO COME IN."

BUT THE STORE MANAGER SAID EVEN

AFTER THURSDAY'S STORM, THEY

WERE

STILL PREPARED FOR SUNDAY

SHOPPERS.

"WE GOT BEAT UP A LITTLE BIT

THERE EARLIER WITH

THURSDAY'S LOAD, BUT WE'VE HAD

TWO TRUCKS COME IN SINCE THEN

AND WE'VE GOTTEN OURSELVES

BACK INTO SHAPE. ROCK SALTS BACK

IN. THAT WAS OUT YESTERDAY BUT

CAME IN LAST NIGHT JUST IN TIME

FOR THE STORM."

WITH THE SNOW STARTING TO STICK,

SOME SHOPPERS SAID IT WOULD BE A

QUICK

STOP TO PICK UP SOME STAPLES.

"JUST YOU KNOW BASIC STUFF TO

MAKE SURE

THERE'S FOOD IN THE HOUSE IN

CASE YOU'RE SNOWED IN. MILK AND

BREAD ARE USUALLY THE

FIRST TWO THINGS I GO, SO I MAKE

SURE I STOCK UP ON A LOT OF

THAT."

"MILK, EGGS, BREAD, AND THEN IF

WE'RE RUNNING

LOW ON OTHER THINGS I TRY TO GET

THAT AT THE SAME TIME AS LONG AS

I'M OUT"

I SPOKE WITH A SHOPPER WHO WAS

PASSING THROUGH TOWN. SHE SAID

SHE

HAD TO STOCK HER HOTEL ROOM WITH

FOODS THAT COULD FORGO THE

REFRIDGERATOR.

"PEANUT BUTTER, PEANUT BUTTER IS

ALWAYS PERFECT

BECAUSE YOU DON'T HAVE TO

REFRIDGERATE IT. PEPPERONI,

BECAUSE UH YOU SHOULD

REFRIDGERATE

IT BUT IT CAN LIVE WITHOUT IT

FOR A WHILE, AND POTATO CHIPS."

ONE CUSTOMER SAID SHE WAS

STOCKING UP ON SUPPLIES TO MAKE

HEARTY SOUPS FOR THE SNOWY

WEATHER. SHE SAID FOOD WAS IN

SHORT SUPPLY AT HER HOUSE AFTER

THURSDAY'S SNOW DAY.

"WE WERE ALL HOME FOR AN EXTRA

DAY, AND WHEN

YOU'RE HOME YOU JUST EAT MORE.

WE WERE EATIN OUT OF HOUSE AND

HOME THURSDAY, THEN WE LEFT

TOWN FRIDAY NIGHT AND GOT BACK

LATE LAST NIGHT, SO I'M UP

EARLIER THAN I WOULD LIKE TO BE

THIS

Không có nhận xét nào:

Đăng nhận xét